
There is something so magical about a summer backyard BBQ. The smell of charcoal in the air, the sound of kids splashing in the pool, and the anticipation of fireworks as the sun begins to set. But if you’re like me, the highlight of any 4th of July celebration is the dessert table!

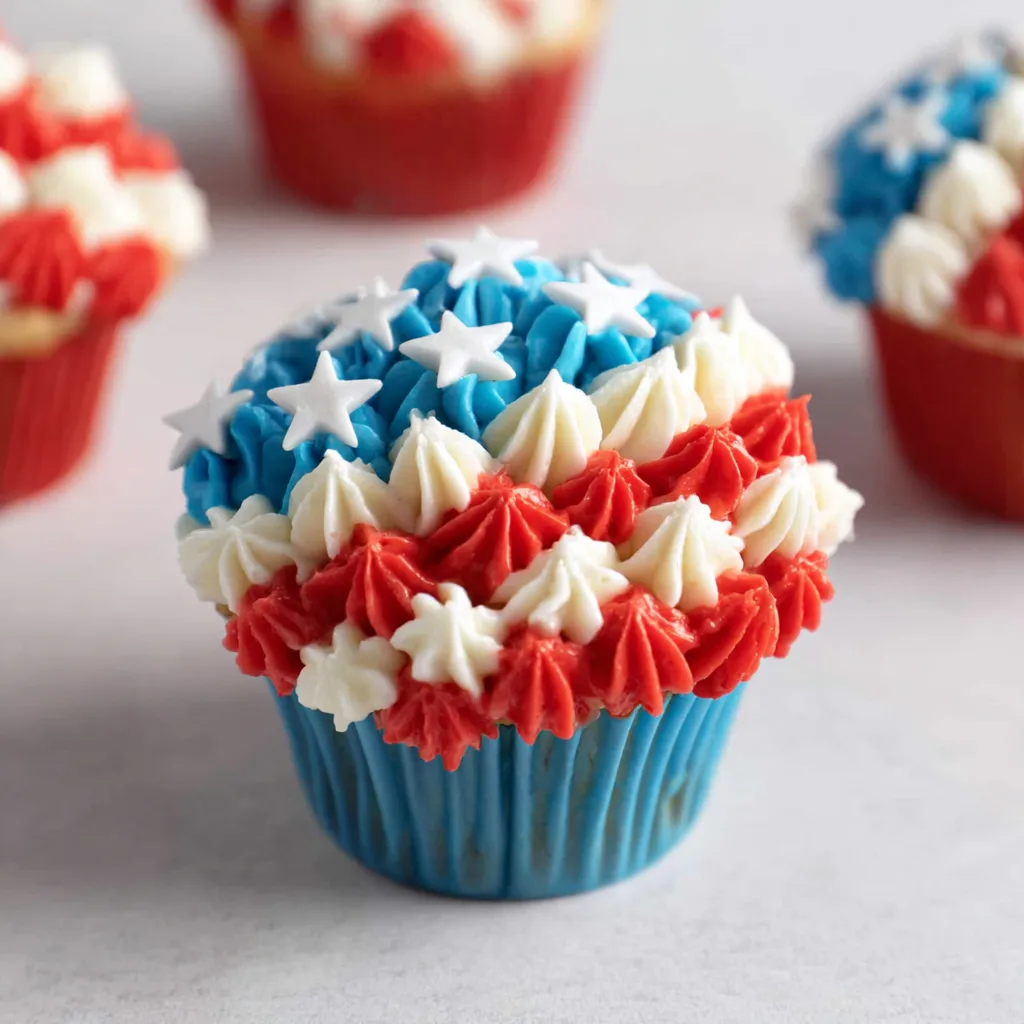
These 4th of July Flag Cupcakes are my favorite way to bring a little patriotic flair to the party without spending all day in a hot kitchen. They look incredibly professional like something you’d find in a high-end bakery—but the secret is that they are surprisingly easy to decorate using a simple star-piping technique.
Whether you’re heading to a neighborhood potluck or hosting the whole family, these flag cupcakes are guaranteed to be the star of the show (pun intended!).
Why You’ll Love This Recipe
- Semi-Homemade Shortcut: By using your favorite cupcake mix and pre-made frosting, you can focus all your energy on the fun part: decorating!
- Impressive Results: The piped star pattern creates a beautiful “American Flag” texture that looks much more difficult than it actually is.
- Kid-Friendly Activity: Kids love helping to mix the colors and adding the star sprinkles at the very end.
- Make-Ahead Friendly: You can actually make the frosting a day early; the colors actually get more vibrant as they sit!
Ingredient Notes
To get that perfect “Old Glory” look, the quality of your ingredients matters—especially when it comes to color.
- Cupcakes: You’ll need 24 baked and completely cooled cupcakes. You can use vanilla, chocolate, or even a fun “firecracker” red velvet. Just ensure they are level so your flag stays straight!
- Vanilla Frosting: I recommend using a “decorator” style or a stiff vanilla frosting. The standard “whipped” varieties can sometimes be too soft to hold the sharp points of the star piping.
- Gel Food Coloring: This is my #1 tip. Do not use liquid food coloring (the kind in the little teardrop bottles). It will thin out your frosting and make it runny. Gel coloring (like Wilton or Americolor) provides deep, vibrant red and blue without changing the consistency.
- Star Sprinkles: These are the finishing touch! White star sprinkles on the blue field really sell the flag look.
Step-by-Step Instructions
Decorating these cupcakes is all about the “star tip” technique. If you’ve never used a piping bag before, don’t worry—this is the perfect beginner project.
1. Color Your Frosting
Start by dividing your frosting. Keep one tub white. For the red and blue, scoop the other two tubs into separate bowls. Add a tiny amount of red gel to one and blue to the other. Stir well with a spoon.
Pro Tip: Always add less than you think you need. You can always add more, but you can’t take it away!
2. Prepare Your Piping Bags
Fit your piping bags with a Wilton #18 star tip. If you only have one tip, you’ll need to wash it between colors. Using “couplers” makes this much easier as you can just unscrew the tip and move it to the next bag.
3. Piping the White Stars
Hold the piping bag vertically (90 degrees to the cupcake). Squeeze the bag, let the frosting build up for a second, then stop squeezing and pull straight up.
- Pipe one full row across the bottom.
- Pipe two partial rows above it, leaving space on the left for the blue.
4. Adding the Red and Blue
Repeat the star technique with the red frosting to create the alternating stripes. Finally, fill in the remaining square in the top-left corner with blue stars.
5. The Grand Finale
Carefully place your white star sprinkles onto the blue frosting. I find that using a pair of clean kitchen tweezers helps place them perfectly!
Expert Tips for Best Results
- Temperature is Key: If your hands are very warm, the frosting in the bag might start to melt. If you notice the stars losing their shape, put the piping bag in the refrigerator for 5 minutes to firm up.
- The “Deep Red” Trick: Getting a true red can be tricky. If your frosting looks pink, add a tiny drop of brown or purple to deepen the tone, or simply let the frosting sit for a few hours. The color oxidizes and darkens over time.
- Uniformity: Try to keep your stars the same size by counting “one-two” for every squeeze. This helps the flag look symmetrical across all 24 cupcakes.
Variations and Substitutions
- Flavor Swap: Feel free to use lemon frosting or even a light cream cheese frosting, provided it is stiff enough to hold a shape.
- Fruit Version: If you want a “lighter” version, you can use rows of sliced strawberries, blueberries, and mini marshmallows to create the flag pattern!
- Gluten-Free: Simply use your favorite gluten-free boxed cake mix. The decorating process remains exactly the same.
Storage and Freezing
To Store: These cupcakes can sit at room temperature for up to 2 days in an airtight container. If your kitchen is very warm, keep them in the fridge, but let them come to room temperature before serving for the best frosting texture.
To Freeze: You can freeze the un-frosted cupcakes for up to 3 months. I do not recommend freezing the decorated cupcakes, as the food coloring can “bleed” or sweat as they thaw, ruining your beautiful flag design.
FAQ
Can I use store-bought frosting?
Absolutely! That is what this recipe is designed for. Just make sure it’s not the “whipped” variety, as it’s often too soft for detailed piping.
How do I get my red frosting to look dark red and not pink?
Use “No-Taste Red” gel coloring. Standard red can sometimes have a bitter aftertaste if you use too much. Letting the frosting sit overnight is the best way to let the color develop.
What if I don’t have a star tip?
You can use a round tip to make “dots” instead of stars, or even just a small plastic bag with the corner snipped off. It will have a different texture, but the flag effect will still be clear!
Happy 4th of July!
There’s nothing quite like the pride of putting a homemade (or semi-homemade!) treat on the table that looks this good. These 4th of July Flag Cupcakes are more than just a dessert; they’re a conversation starter and a festive tradition in the making.
If you try this recipe, I’d love to see your creations! Tag me on Instagram or save this to your “Patriotic Recipes” board on Pinterest. Happy celebrating!
Print
Easy 4th of July Flag Cupcakes
Celebrate Independence Day with these stunning 4th of July Flag Cupcakes! Using simple piping techniques and vibrant gel colors, you can turn store-bought or homemade cupcakes into a patriotic masterpiece.
- Total Time: 45
- Yield: 24 cupcakes
Ingredients
24 cupcakes (baked and cooled)
3 tubs vanilla frosting
Red gel food coloring
Blue gel food coloring
White star sprinkles
Instructions
1. Scoop one tub of vanilla frosting into a bowl. Add red gel food coloring using a toothpick. Mix until the color is vibrant.
2. Scoop the second tub of frosting into another bowl and add blue gel food coloring. Mix well.
3. Prepare your piping bags. If using one tip, start with white frosting. If using multiple tips, fill red, white, and blue bags.
4. Starting at the bottom of the cupcake, pipe a full row of white stars by holding the bag vertically, squeezing, and pulling straight up.
5. Pipe two partial rows of white stars, leaving space for red stripes and the blue field.
6. Pipe red stars in one full row and two partial rows to complete the striped pattern.
7. Pipe several short rows of blue stars in the top-left empty space.
8. Top the blue frosting with white star sprinkles to represent the stars on the flag.
Notes
The icing colors will darken as they sit, so you can make the frosting a day ahead for deeper reds and blues.
If your frosting gets too soft while piping, pop the piping bag in the fridge for 5-10 minutes.
- Prep Time: 45
- Category: Dessert
- Method: Piping
- Cuisine: American