
Cheesy garlic chicken wraps are exactly what your busy weeknight dinner rotation has been missing! I’m Aaron, and after testing this recipe over a dozen times in my own kitchen, I can confidently say these crispy, gooey, flavor-packed wraps deliver restaurant-quality taste in just 22 minutes. With high-protein chicken wraps trending massively in 2025, this recipe combines the viral appeal of crispy wraps with the comfort of melted cheese and aromatic garlic—creating the perfect storm of satisfying, shareable content that your family (and your Instagram followers) will absolutely love.

What makes these wraps truly special isn’t just the incredible melty cheese center or the crispy golden exterior—it’s how they solve that eternal dinner dilemma: “What’s quick, healthy, and actually tastes amazing?” With 38 grams of protein per serving and ready in under 25 minutes, these cheesy garlic chicken wraps have become my go-to solution for everything from meal prep Monday to “what’s for dinner?” panic on Thursday night.
These wraps pair beautifully with fresh sides like my cucumber dill salad for a complete, balanced meal.
Quick Recipe Summary
Total Time: 22 minutes
Servings: 2
Protein per serving: 38g
Perfect for: Lunch, dinner, meal prep, social media content
What Makes These Cheesy Garlic Chicken Wraps So Addictive
The Secret to Perfect Crispy Wraps
After experimenting with dozens of wrapping techniques for cheesy garlic chicken wraps, I discovered the game-changing secret: seam-side down cooking with a lid. This method creates that coveted crispy exterior while ensuring the cheese melts completely and the filling heats through evenly. The result? Cheesy garlic chicken wraps that photograph beautifully and taste even better than they look, with that perfect golden crust that makes these wraps irresistible.
Why This Recipe Works Every Time
These cheesy garlic chicken wraps succeed where other high-protein chicken wraps fail because they balance moisture, fat, and texture perfectly. The combination of light mayo and Greek yogurt creates creamy richness without making the cheesy garlic chicken wraps soggy, while the fresh garlic provides that aromatic punch that makes your kitchen smell incredible and transforms ordinary chicken wraps into extraordinary cheesy garlic chicken wraps.
Trending Appeal: Why Everyone’s Making These Wraps
High-protein wraps have exploded in popularity throughout 2025, and for good reason. They satisfy multiple dietary trends simultaneously:
- High-protein nutrition (38g per serving)
- Quick meal prep capability
- Instagram-worthy presentation
- Comfort food satisfaction
- Budget-friendly ingredients
According to the American Heart Association, incorporating lean proteins like chicken into your diet supports heart health and muscle maintenance.
Essential Ingredients for Perfect Cheesy Garlic Chicken Wraps
Protein Foundation
- 7 oz cooked chicken (about 200g, chopped) – Rotisserie chicken is your best friend here
- 2 large tortillas – Regular or low-carb/high-protein varieties work perfectly
The Creamy Garlic Base
- 2 garlic cloves (minced or grated) – This is where the flavor magic happens
- 2 tablespoons light mayonnaise
- 1 tablespoon light Greek yogurt – Adds protein and tang
- 2 teaspoons hot sauce (like Frank’s) – Customizable heat level
- ¼ teaspoon salt – Essential for flavor balance
The Cheese Experience
- 3 oz grated cheese (about 90g) – I use a cheddar blend for maximum meltability
- 1 green onion, chopped – Fresh flavor and color contrast
- Olive oil spray – For that perfect golden crisp
Aaron’s Pro Tips for Ingredient Success
Chicken Selection: Rotisserie chicken isn’t just convenient—it’s actually superior here because it’s already seasoned and has the perfect texture for mixing. If using leftover grilled chicken, add an extra pinch of salt.
Cheese Wisdom: Don’t skimp on cheese quality. A good cheddar blend melts better than pre-shredded cheese and creates that Instagram-worthy cheese pull we all love.
Garlic Game: Fresh garlic makes all the difference. If you only have garlic powder, use ½ teaspoon instead.
Step-by-Step: Creating the Perfect Cheesy Garlic Chicken Wraps
Prep Phase (10 minutes)
Step 1: Build Your Flavor Base In a medium bowl, combine chopped chicken, minced garlic, mayonnaise, Greek yogurt, hot sauce, and salt. Mix thoroughly until the chicken is completely coated. This mixture can be made up to 3 days ahead—in fact, it tastes even better after the flavors meld overnight.
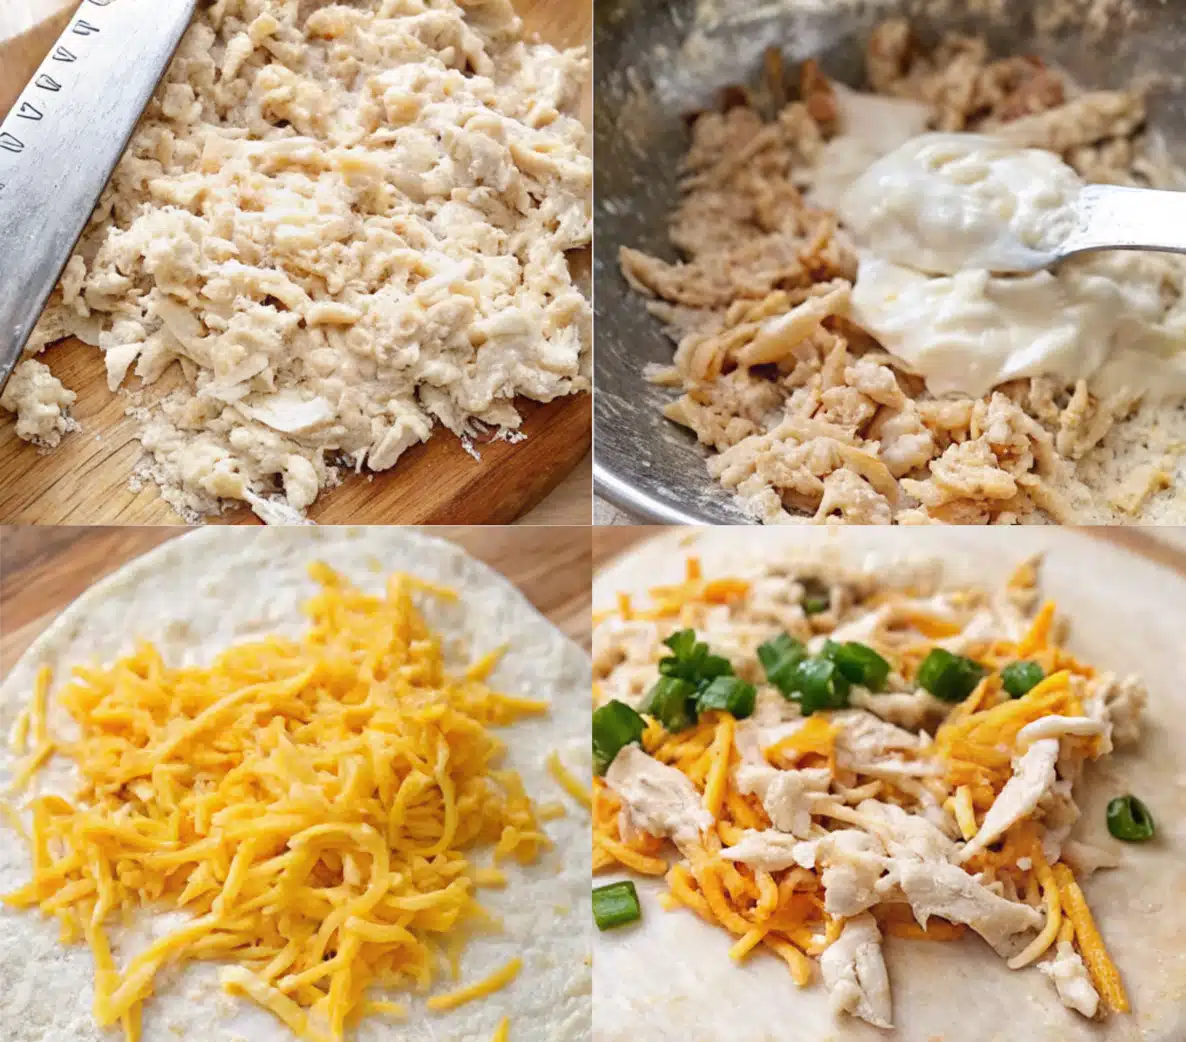
Step 2: Assembly Strategy Lay out your tortilla and visualize it in thirds. On the lower third, sprinkle about 2 tablespoons of cheese. This creates your “cheese foundation” that will help seal the wrap and create that stretchy cheese pull.
The Wrapping Technique That Changes Everything
Step 3: Perfect Filling Distribution Top the cheese foundation with about ⅔ cup of your chicken mixture. Don’t overfill—this is the most common mistake that leads to burst wraps. Add another tablespoon of cheese and a sprinkle of green onion.
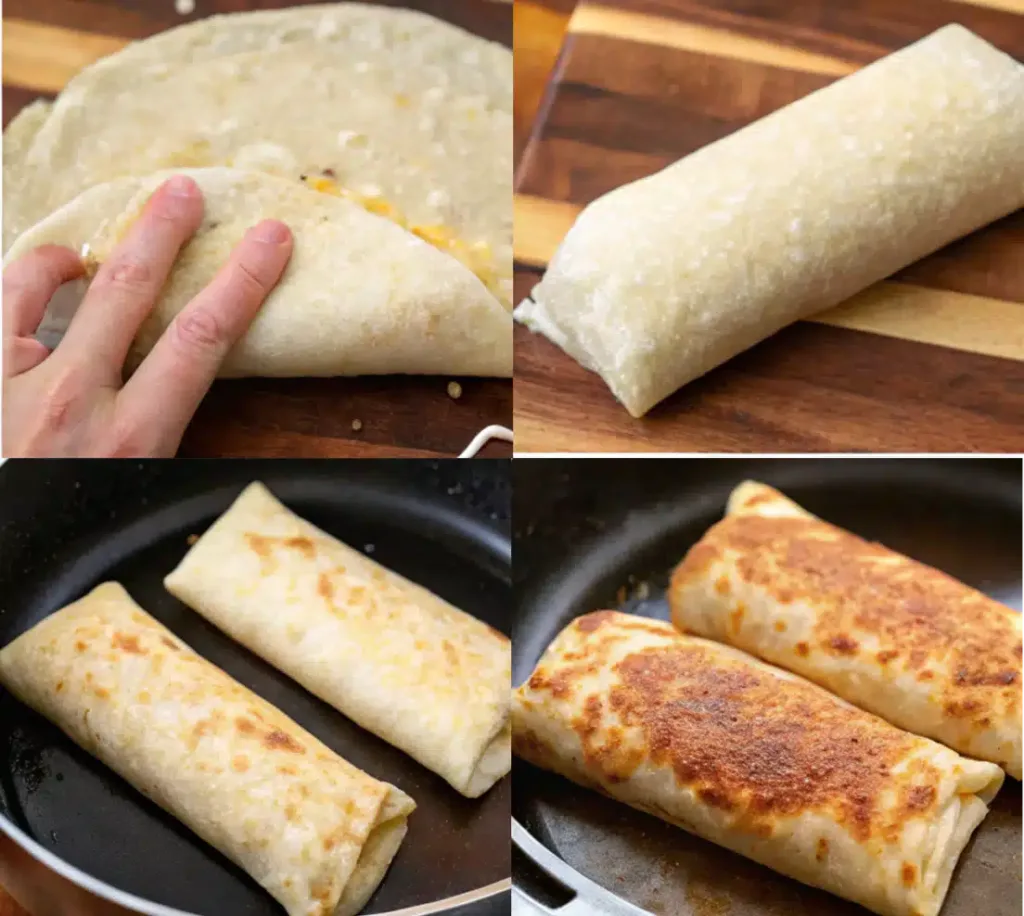
Step 4: The Professional Wrap Here’s where most people go wrong: fold in the sides FIRST, then roll from bottom to top. This creates a secure wrap that won’t unravel during cooking. Roll tightly but not aggressively—you want compression without squeezing out the filling.
Cooking for Crispy Perfection (7 minutes)
Step 5: The Game-Changing Cooking Method Heat a non-stick pan over medium-high heat. Spray with olive oil. Place wraps seam-side down—this is crucial for preventing unrolling. Cook for 3-4 minutes per side until golden and crispy.
Step 6: The Melting Magic Here’s my secret weapon: cover the pan with a lid during cooking. This creates steam that melts the cheese faster and heats the filling thoroughly while maintaining that crispy exterior.
Mastering Variations: Make These Wraps Your Own
Spice Level Customization
- Mild: Skip the hot sauce, add extra garlic
- Medium: Use the recipe as written
- Hot: Add diced jalapeños or increase hot sauce to 1 tablespoon
- Fire: Include a pinch of cayenne pepper
Dietary Adaptations
Keto-Friendly Version: Use low-carb tortillas and increase cheese to 4 oz. Add diced avocado for extra healthy fats.
Lighter Option: Reduce cheese to 2 oz and use all Greek yogurt instead of mayo. Add shredded lettuce for crunch.
Gluten-Free: Substitute with your favorite gluten-free tortillas—corn tortillas work wonderfully and add authentic flavor.
Flavor Profile Switches
Mediterranean Style: Replace cheddar with feta, add sun-dried tomatoes and oregano.
Buffalo Chicken Version: Increase hot sauce to 3 teaspoons, add blue cheese crumbles.
BBQ Twist: Replace hot sauce with BBQ sauce, use smoked cheddar.
Advanced Techniques: Elevating Your Wrap Game
Texture Enhancement Methods
The Crunch Factor: Add finely diced celery or bell peppers to the chicken mixture for textural contrast. This works especially well if you’re meal prepping.
Cheese Layering Strategy: Use different cheese types—sharp cheddar on the bottom for stability, creamy cheese like Monterey Jack in the middle for meltability.
Professional Cooking Tips
Temperature Control: Medium-high heat is crucial. Too low and you won’t get crispy; too high and you’ll burn the outside before the inside heats.
The Steam Technique: Adding a few drops of water to the pan and covering creates steam that melts cheese faster—restaurant chef trick!
Meal Prep Mastery: Making These Wraps Work for Your Week
Make-Ahead Strategies
The Filling Prep: Make a double batch of the chicken filling on Sunday. It keeps for 3 days in the fridge and actually improves in flavor.
Assembly Line Approach: Wrap multiple wraps at once, but don’t cook until ready to eat for maximum crispiness.
Storage Solutions
Cooked Wraps: Store in the fridge for up to 2 days. Reheat in a skillet or air fryer to restore crispiness—never microwave a crispy wrap!
Freezer Strategy: The filling freezes beautifully for up to 1 month. Thaw overnight in the fridge before using.
Serving Suggestions That Wow
Complete Meal Ideas:
- Serve with my cucumber dill salad for a fresh contrast
- Pair with homemade salsa for dipping
- Add a side of air fryer zucchini and squash for extra vegetables
Party Presentation: Slice wraps diagonally and arrange on a platter with small bowls of salsa, guacamole, and sour cream for dipping.
Troubleshooting: Solving Common Wrap Challenges
Problem-Solution Guide
Soggy Wraps:
- Cause: Too much sauce or wet ingredients
- Solution: Pat chicken dry before mixing, use less wet ingredients
Burst Wraps:
- Cause: Overfilling or rolling too tightly
- Solution: Use less filling (about ⅔ cup max), roll firmly but not aggressively
Uneven Heating:
- Cause: Pan too hot or no lid coverage
- Solution: Medium heat + lid trick for even heating
Cheese Not Melting:
- Cause: Cooking too quickly or cheese too cold
- Solution: Let cheese come to room temperature, use the steam method
Pro Recovery Tips
If your wrap does burst during cooking, don’t panic! Simply press the edges back together with a spatula and continue cooking seam-side down. It’ll still taste amazing.
FAQ: Everything You Need to Know About Cheesy Garlic Chicken Wraps
What to put in a garlic chicken wrap?
The beauty of garlic chicken wraps lies in their versatility! Beyond the core ingredients (chicken, garlic, cheese), popular additions include diced tomatoes, lettuce, bell peppers, onions, avocado, and various sauces. I recommend starting with the base recipe and adding vegetables for crunch and freshness.
How do you make cheesy garlic wraps?
The key to perfect cheesy garlic wraps is the layering technique: cheese on the bottom for sealing, filling in the middle, more cheese on top for that Instagram-worthy cheese pull. Use a blend of cheeses for best melting results, and always cook seam-side down with a lid for optimal melting.
What normally goes in a chicken wrap?
Traditional chicken wraps typically include cooked chicken, vegetables (lettuce, tomatoes, onions), cheese, and a sauce or dressing. However, cheesy garlic chicken wraps elevate this basic formula with aromatic garlic, creamy Greek yogurt, and a crispy exterior that sets them apart from standard wraps.
What fillings to put in wraps?
Popular wrap fillings include proteins (chicken, turkey, ham, beans), vegetables (lettuce, tomatoes, cucumbers, peppers), cheeses, and sauces. For high-protein chicken wraps, focus on lean proteins, minimal high-water vegetables (to prevent sogginess), and flavorful but not overly wet sauces.
What are the three ingredients in wraps?
The three essential components of any great wrap are: 1) The tortilla (your foundation), 2) The protein (chicken in our case), and 3) The binding element (cheese, sauce, or spread). Everything else is enhancement, but these three elements must work in harmony.
What is a good condiment for wraps?
The best condiments for wraps provide flavor and moisture without making the wrap soggy. Greek yogurt-based sauces, light mayo mixtures, mustard, hot sauce, and pesto work beautifully. For cheesy garlic chicken wraps, the garlic-yogurt-mayo combination creates the perfect creamy, flavorful base.
After making cheesy garlic chicken wraps hundreds of times (and sharing them with friends, family, and neighbors who now regularly request them), I can confidently say this recipe solves the universal dinner dilemma. They’re quick enough for busy weeknights, delicious enough for weekend treats, healthy enough to feel good about, and photogenic enough to share.
The combination of crispy exterior, melty cheese interior, and that perfect garlic aroma creates a sensory experience that goes beyond just eating—it’s comfort food that actually fits your nutritional goals. Whether you’re meal prepping for the week, looking for a post-workout protein hit, or just want something that tastes indulgent without the guilt, these wraps deliver on every level.
Ready to make these addictive wraps? Start with the basic recipe, then experiment with the variations that speak to your taste preferences. Don’t forget to tag me when you share your creations—I love seeing how everyone makes these wraps their own!
For more quick, protein-packed recipes that actually taste amazing, check out my homemade crunchwrap supreme or try my chicken broccoli cheddar soup for another comforting, high-protein meal that’s ready in minutes.
Print
Cheesy Garlic Chicken Wraps
Cheesy garlic chicken wraps with crispy tortillas, melty cheese, and savory chicken filling. Quick, high-protein, and perfect for lunch, dinner, or meal prep.
- Total Time: 22 minutes
- Yield: 2 servings
Ingredients
2 large tortillas (regular or low-carb/high-protein)
7 oz cooked chicken, chopped (about 200g – rotisserie works great)
2 garlic cloves, minced or grated
2 tbsp light mayonnaise
1 tbsp light Greek yogurt or plain yogurt
2 tsp hot sauce (like Frank’s RedHot)
¼ tsp salt
3 oz grated cheese (about 90g, cheddar blend recommended)
1 green onion, chopped
Olive oil spray for cooking
Instructions
1. In a bowl, mix chopped chicken, garlic, mayonnaise, yogurt, hot sauce, and salt until combined.
2. Lay out tortillas. On lower third, sprinkle 2 tbsp cheese, add ⅔ cup chicken mixture, then another tbsp of cheese and green onion.
3. Fold in sides and roll tightly into wrap.
4. Heat a non-stick pan over medium-high heat. Spray with olive oil. Cook wraps seam-side down for 3–4 minutes, then flip and cook another 3–4 minutes until golden and crispy. Cover with lid to melt cheese.
5. Slice wraps in half diagonally. Serve hot with salsa, salad, or pickles.
Notes
Covering the pan helps melt cheese and heat filling faster.
Make filling up to 3 days ahead. Store cooked wraps in fridge 2 days; reheat in skillet or air fryer.
Air fryer option: 375°F for 6–8 minutes. Baking option: 400°F for 10–12 minutes, flipping once.
Don’t overfill: stick to ⅔ cup filling per wrap.
- Prep Time: 15 minutes
- Cook Time: 7 minutes
- Method: Pan-Fried
- Cuisine: American, Healthy