
There is nothing quite like the satisfaction of sipping a refreshing bubble tea and reaching those chewy, sweet pearls at the bottom of the cup. While store-bought boba is convenient, making Homemade Boba Pearls from scratch elevates your tea game to a professional level. Not only can you control the sugar content, but you can also experiment with vibrant, natural flavors that you simply can’t find in a package.
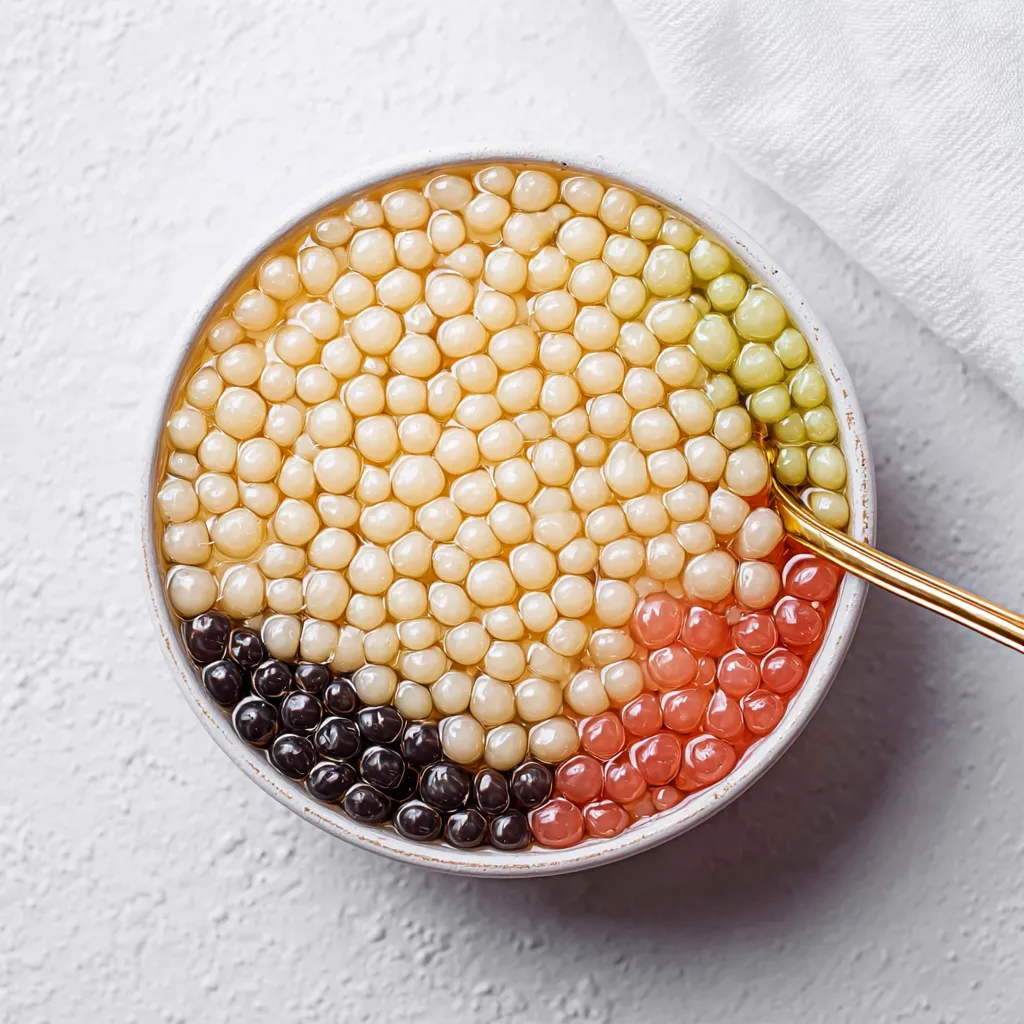
This guide will walk you through the surprisingly simple process of creating “QQ” (the Taiwanese term for the perfect chewy texture) boba in five stunning variations: classic Brown Sugar, earthy Matcha, and fresh Strawberry, Mango, and Peach. Whether you are a bubble tea aficionado or a curious kitchen adventurer, these pearls will transform your home kitchen into a boutique boba shop. Get ready to roll, boil, and enjoy the freshest pearls you’ve ever tasted!
Why You’ll Love This Recipe
Making your own boba pearls is a rewarding culinary project that offers several advantages over the dried, preservative-laden versions found in stores. First and foremost is the freshness. Fresh tapioca starch creates a texture that is vastly superior—soft on the outside with a perfectly resilient center.
Secondly, this recipe uses real fruit purees. Most commercial boba uses artificial dyes and flavors; here, the vibrant colors of strawberry and mango come directly from the fruit. It’s also a fantastic budget-friendly option. For the price of one boba tea at a cafe, you can make enough pearls for the whole family for a week. Plus, it is a fun, tactile activity that kids and adults alike will find incredibly therapeutic.
What Is Boba (Tapioca Pearls)?
Boba, also known as tapioca pearls, originated in Taiwan in the 1980s. These delightful spheres are made primarily from tapioca starch, which is a gluten-free flour derived from the cassava root. When mixed with hot liquid and sugar, the starch gelatinizes, creating a dough that can be rolled into balls.
The defining characteristic of a great boba pearl is its chewiness, often referred to as “QQ.” This unique texture is achieved through a specific cooking process where the pearls are boiled until translucent and then “rested” to lock in the bounce. While traditional boba is flavored with brown sugar or honey, the modern boba movement has expanded to include fruit-infused doughs, making the experience more customizable than ever.
Ingredients Overview
To achieve the perfect pearl, you only need a few pantry staples, but the quality of your tapioca starch is paramount. Ensure you are using 100% pure tapioca starch (not tapioca flour or cassava flour, which can sometimes have different grinds).
- Tapioca Starch: The backbone of the recipe. It provides the signature chew.
- Sugars: For the Brown Sugar flavor, use dark brown sugar or Muscovado for that deep, molasses-like undertone. For fruit flavors, cane sugar allows the fruit’s natural brightness to shine.
- Fruit Purees: Fresh strawberries, ripe mangoes, or juicy peaches. Blending and straining these ensures a smooth dough without chunks that could cause the pearls to break.
- Matcha: Use ceremonial grade matcha for the most vibrant green color and a smooth, non-bitter finish.
- Liquids: Filtered water is used for the classic flavors to ensure no off-tastes interfere with the tea.
- Syrup: A final soak in maple syrup or agave prevents the pearls from sticking together and adds a final layer of sweetness.
Ingredient Substitutions & Tips
If you don’t have access to fresh fruit, store-bought fruit juices (100% juice) can work as a substitute for the puree/water mixture. However, ensure they aren’t “from concentrate” for the best flavor profile. For the sweetener, if you are looking for a lower-glycemic option, you can use coconut sugar, though it will darken the color of your fruit-flavored pearls.
Food coloring is entirely optional. Real fruit purees provide a lovely pastel hue, but if you want that “Instagram-ready” pop of color, 1-2 drops of gel food coloring will do the trick without affecting the texture. Avoid liquid food coloring in large amounts, as it can throw off the hydration levels of your starch.
Step-by-Step Instructions
1. Prepping the Liquids
For fruit flavors, blend your fruit until liquefied and pass it through a fine-mesh sieve. You want exactly 70 mL of smooth liquid. In a small pot, combine your liquid (fruit puree or water), sugar, and any powders (like matcha). Stir over medium heat until the sugar is fully dissolved and the mixture reaches a gentle simmer.
2. Creating the Gelatinized Paste
This is the most critical step. Once the liquid is simmering, add roughly half of your tapioca starch. Stir vigorously with a spatula. The mixture will quickly turn into a thick, translucent, and very sticky paste. This “pre-cook” method ensures your pearls won’t fall apart later in the boiling water.
3. Kneading the Dough
Remove the pot from the heat and add the remaining starch. Mix until it clumps together, then turn it out onto a clean surface. Knead the dough while it is still warm. It should become smooth, elastic, and feel like soft playdough. If it’s too sticky, add starch by the teaspoon. If it’s too dry, add a tiny drop of water.
4. Shaping the Pearls
Divide the dough and roll into thin logs (about 1 cm diameter). Cut into small segments and roll between your palms to form spheres. Pro Tip: Roll multiple pieces at once under your palm to save time! Toss the finished balls in a bowl with extra starch to prevent sticking.
5. The Boiling Process
Bring a large pot of water to a rolling boil. Add the pearls and stir gently so they don’t stick to the bottom. Once they float, boil for 15–20 minutes. Turn off the heat, cover the pot, and let them “rest” in the hot water for 5 minutes. This ensures the center is fully cooked and chewy.
6. The Sweet Soak
Drain the pearls and rinse briefly with room temperature water. Immediately submerge them in your syrup of choice. This sweetens the pearls from the outside in and keeps them separated.
Expert Baking/Cooking Tips
The secret to professional-grade boba lies in temperature control. Tapioca starch is finicky; if your liquid isn’t hot enough when you add the first half of the starch, it won’t gelatinize, and you’ll end up with a watery mess rather than a dough.
Another expert tip is to work in small batches. Because tapioca dough dries out rapidly when exposed to air, always keep the portion you aren’t currently rolling under a damp cloth or wrapped tightly in plastic wrap. If the dough does become crumbly, don’t toss it! You can often revive it by kneading it with slightly damp hands to reintroduce just enough moisture to make it pliable again.
The Science of “QQ” Texture
In Taiwanese food culture, “QQ” is the gold standard for textures—it refers to something that is bouncy, rubbery, and chewy all at once. This texture is a result of the retrogradation and gelatinization of starch molecules. When we heat the tapioca starch with liquid, the starch granules swell and burst, creating a gel.
By using the “half-in, half-out” method for the starch, we create a hybrid dough. The cooked portion provides the structure and “bounce,” while the raw portion added later provides the body and ease of shaping. This balance is what prevents your boba from becoming “mushy” or “gritty,” giving you that perfect cafe-quality mouthfeel every single time.
Serving Suggestions
Once your pearls are ready, the possibilities are endless! The Brown Sugar pearls are classic in a “Tiger Sugar” style milk tea with cold whole milk. Matcha pearls pair beautifully with a strawberry latte, creating a stunning green-and-pink contrast. For the Fruit pearls, try them in sparkling water with a splash of lime for a refreshing, low-caffeine treat, or add them to a fruit smoothie bowl for an unexpected textural surprise.
Storage & Make-Ahead Tips
Uncooked pearls: These are perfect for making ahead! Once rolled and dusted in starch, place them in a single layer on a tray and freeze. Once solid, transfer to a freezer bag. They keep for 3 months and can be boiled directly from frozen (just add 5 minutes to the boil time).
Cooked pearls: Boba is best consumed within 4 hours. Do not refrigerate cooked boba, as the cold temperature causes the starch to crystallize, making them hard and chalky.
FAQs
Q: Why did my boba dough melt into a liquid?
A: This usually happens if the water wasn’t hot enough when the starch was added. The starch must reach a certain temperature to gelatinize. If this happens, try heating the mixture again in a pot while stirring constantly until it thickens.
Q: Can I use cornstarch instead of tapioca starch?
A: No. Cornstarch does not have the same elastic properties as tapioca starch. The resulting pearls would be tough and wouldn’t have the signature “QQ” chew.
Q: My pearls are white in the middle after boiling. What happened?
A: They are undercooked. The centers should be translucent. Increase your boiling time or let them sit in the hot water (covered) for an extra 10 minutes.
Q: How do I get my pearls to be perfectly round?
A: While hand-rolling is the standard, don’t worry about perfection! “Oblong” pearls taste exactly the same. For perfect spheres, you can use a boba-maker mold, but the “palm-rolling” method mentioned in the steps is the most efficient.
Making Homemade Boba Pearls is a delightful journey into the heart of Taiwanese tea culture. By mastering this five-flavor technique, you move beyond the limitations of store-bought toppings and enter a world of fresh, vibrant, and customizable treats. While the rolling takes a bit of patience, the first sip of your DIY bubble tea will prove it was worth every second. Grab your tapioca starch, pick your favorite flavor, and start rolling!
Print
Homemade Boba Pearls
Master the art of DIY bubble tea with this foolproof recipe for homemade boba pearls. Whether you crave the deep molasses notes of brown sugar boba or the vibrant, fresh taste of real fruit pearls like strawberry, mango, and peach, this guide covers it all.
- Total Time: 65 minutes
- Yield: 4 servings
Ingredients
Brown Sugar: ⅓ cup water – 70 mL
Dark brown sugar – 65g
Tapioca starch – 110g
Black food coloring – 2 drops
Matcha: ⅓ cup water – 70 mL
Cane sugar – ⅓ cup
Matcha powder – 1 tbsp
Tapioca starch – 110g
Strawberry: Strawberry puree – 70 mL
Cane sugar – 2 tbsp
Tapioca starch – 110g
Mango: Mango puree – 70 mL
Cane sugar – 2 tbsp
Tapioca starch – 110g
Peach: Peach puree – 70 mL
Cane sugar – 2 tbsp
Tapioca starch – 110g
Syrup: Maple syrup – ¼ cup
Instructions
Prepare liquid by simmering sugar and water or fruit puree in a pot.
Add half the tapioca starch to the simmering liquid and stir into a sticky paste.
Remove from heat and add remaining starch, kneading until a smooth dough forms.
Roll dough into long logs, cut into small pieces, and roll into 1cm balls.
Dust pearls with starch and shake off excess.
Boil in water for 20 minutes until they rise to the surface.
Turn off heat, cover, and let sit for 5 minutes.
Drain and soak in syrup immediately to prevent sticking.
Notes
• If dough is too dry, add 1 tsp water and knead.
• If dough is too sticky, add more starch gradually.
• Work quickly to prevent the starch from drying out.
• Store raw pearls in the freezer; never refrigerate cooked boba.
- Prep Time: 40 minutes
- Cook Time: 25 minutes
- Cuisine: Taiwanese