These gluten free pumpkin dinner rolls are pillowy-soft and fluffy, and they’re super easy to make. The pumpkin puree makes them deliciously tender, while giving them a vibrant orange hue and a subtle pumpkin flavor. They’re a fun twist on traditional dinner rolls, perfect for holiday tables, and you’d never guess they’re gluten free. In this post, we’ll walk you through everything: the ingredients, step-by-step instructions, pro baking tips, common mistakes to avoid, and answers to the most asked questions about pumpkin rolls. If you’ve struggled with gluten free baking before, don’t worry—this recipe is approachable, foolproof, and delivers bakery-quality results at home. Check out our other bread recipes here for even more inspiration.
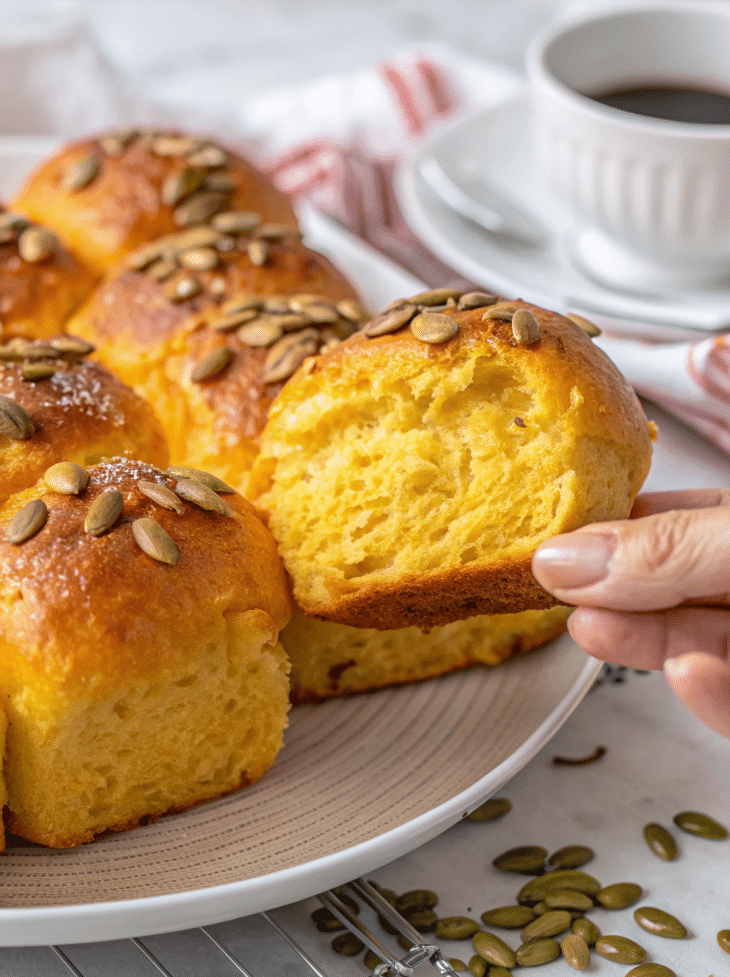
Table of Contents
Why Gluten Free Pumpkin Dinner Rolls Are So Special
The Rise of Gluten Free Baking
Gluten free baking has transformed dramatically over the past decade. What once produced dense, crumbly loaves is now capable of creating soft, airy breads that rival traditional recipes. More people than ever are turning to gluten free diets, whether because of celiac disease, gluten sensitivity, or simply as a lifestyle choice. But let’s face it—when you give up gluten, the hardest thing to replace is bread. That’s where recipes like gluten free pumpkin dinner rolls step in. They offer that comforting, bakery-style bite without any compromise.
Pumpkin as a Secret Ingredient
Pumpkin puree does more than add seasonal flair. It brings a natural moisture that keeps the rolls tender, a subtle sweetness that balances savory meals, and a beautiful golden-orange color that makes your dinner table instantly festive. Unlike many gluten free rolls that dry out quickly, these stay soft for days—thanks to pumpkin’s high water content. Even better, pumpkin is naturally packed with vitamins A and C, making these rolls a little more nourishing than your average bread.
Why They Belong on Your Holiday Table
Think of all the times you’ve passed around a bread basket at Thanksgiving or Christmas dinner. Traditional rolls are often the star, but these gluten free pumpkin dinner rolls bring something extra: flavor, color, and inclusivity. No one at the table has to skip the bread basket. And let’s be honest—when your guests see these warm, golden rolls topped with pumpkin seeds, they’ll be reaching for seconds before the turkey even makes it around.
Ingredients for the Perfect Gluten Free Pumpkin Dinner Rolls
Key Gluten Free Flours and Starches
When baking without gluten, the choice of flour makes or breaks the recipe. For these pumpkin dinner rolls, a blend of gluten free flours and starches creates a dough that mimics the structure of wheat bread.
- Tapioca starch gives elasticity and chew, helping the rolls stretch slightly as they rise. This starch is crucial for avoiding that dry, crumbly texture often found in gluten free bread.
- Millet flour is light and mild, balancing the blend with a flavor close to whole wheat. It also adds essential minerals like magnesium and phosphorus.
- Sorghum flour brings a slightly nutty note and improves the color and texture of the rolls. It’s one of the best flours for gluten free yeast breads.
- Xanthan gum ties everything together. It acts like gluten, binding the starches and proteins so the rolls hold their shape. Without it, the dough would collapse instead of rising.
The Power of Psyllium Husk
Many gluten free recipes rely only on xanthan gum, but psyllium husk gel is a true game-changer. When mixed with water, it forms a gel that behaves almost like gluten strands. This gel strengthens the dough, making it smooth and elastic, while also helping the rolls stay moist and fluffy. Think of it as the “glue” that holds your bread together.
Wet Ingredients That Matter
Pumpkin puree is the star here. Not only does it give the rolls their signature flavor and color, but it also adds moisture that prevents the rolls from turning out dry. Alongside pumpkin, a few other wet ingredients play essential roles:
- Eggs: They enrich the dough, giving it structure and richness. They also help with browning during baking.
- Milk: Just enough to soften the dough without making it runny. It adds tenderness and depth of flavor.
- Oil: A splash of sunflower or other neutral oil keeps the crumb light while locking in moisture.
Sweetness and Flavor Boosters
A small amount of sugar doesn’t just sweeten these gluten free pumpkin dinner rolls. Sugar feeds the yeast, helping the dough rise properly. Salt balances everything, keeping the rolls from tasting bland. Finally, pumpkin seeds sprinkled on top not only make the rolls look bakery-worthy but also add a subtle crunch that contrasts beautifully with the soft interior.
Step-by-Step Instructions
Making the Psyllium Gel
The very first step in creating fluffy gluten free pumpkin dinner rolls is preparing the psyllium husk gel. This may sound unusual if you’re new to gluten free baking, but it’s one of the most important tricks. Simply mix the psyllium husk with lukewarm water, stir briefly, and within 30–45 seconds you’ll notice it turning into a gel. This gel is what gives structure and strength to your dough, mimicking the role of gluten. Without it, your rolls could turn out crumbly or flat.
Pro Tip: Always use lukewarm water. If the water is too cold, the gel won’t activate properly. If it’s too hot, it can damage the psyllium fibers.
Mixing the Dry Ingredients
In a separate large bowl (or the bowl of your stand mixer), whisk together the dry ingredients: tapioca starch, millet flour, sorghum flour, sugar, yeast, baking powder, xanthan gum, and salt. Combining them thoroughly at this stage ensures every roll bakes evenly with consistent texture.
If you’re using active dry yeast instead of instant yeast, dissolve it first in the lukewarm milk with a pinch of sugar. Let it sit for about 10 minutes until frothy, then add it to your dough. This extra step “wakes up” the yeast and guarantees a good rise.
Adding Wet Ingredients
Now it’s time to bring everything together. Add your pumpkin puree, milk, eggs, and oil into the psyllium gel, whisking to combine. Next, make a small well in the center of the dry ingredients and pour in the wet mixture. Using the dough hook attachment on a stand mixer, knead until smooth and well incorporated.
The dough will look very soft—almost sticky—but that’s exactly how it should be. Gluten free doughs don’t behave like traditional wheat doughs, so don’t be tempted to add extra flour. Extra flour will only make the rolls dense and heavy.
Kneading the Dough
If you’re using a stand mixer, knead for about 4–5 minutes. If kneading by hand, aim for 6–8 minutes, occasionally scraping the sides of the bowl with a spatula to make sure no dry patches remain. This kneading time is what transforms the dough into a smooth, pliable consistency.
Pro Tip: If you find the dough too sticky to handle, let it chill in the refrigerator for about 1 hour. Cooling firms it slightly, making it easier to shape without compromising the final texture.
Shaping and Proofing
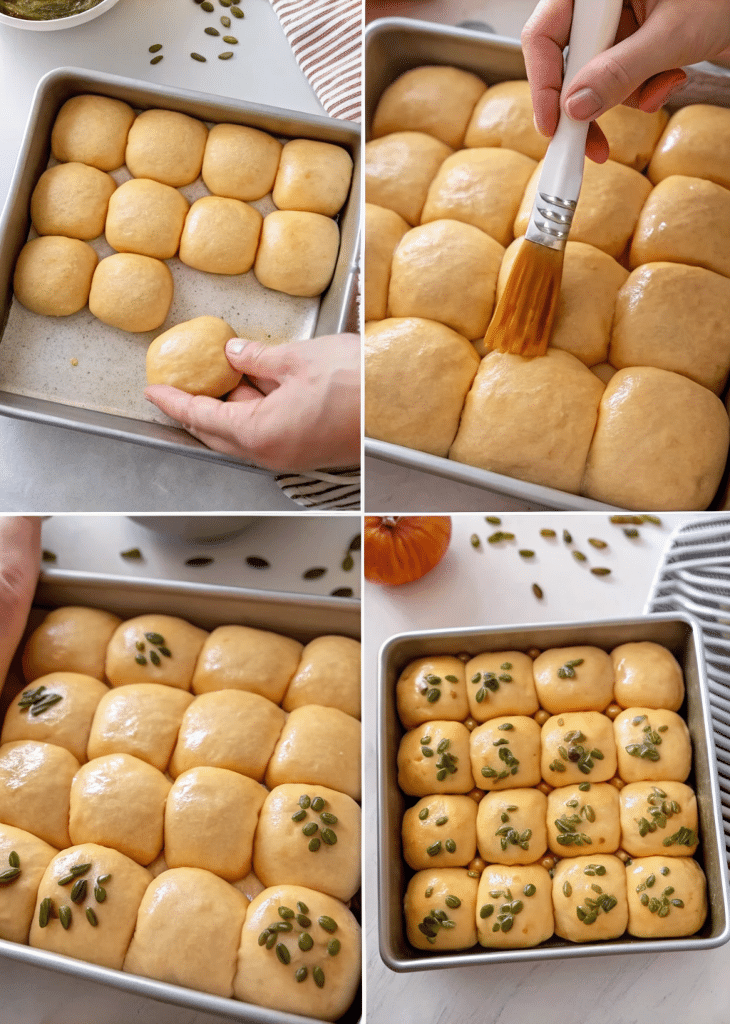
Once kneaded, transfer the dough onto a generously floured surface. Dust the top of the dough with more flour, then gently knead and shape it into a ball. Divide the dough into 16 equal portions—each should weigh about 70 grams. Roll each portion into a smooth ball, tucking the edges underneath for a neat finish.
Arrange the dough balls in a lightly buttered 9-inch square baking pan in a 4×4 grid so that they just touch. Cover with plastic wrap and set in a warm spot to rise. Proofing typically takes about 1 hour to 1 hour and 15 minutes, depending on your kitchen’s temperature. When properly proofed, the rolls should be about double in size and feel light to the touch.
Baking to Golden Perfection
Preheat your oven to 375°F (190°C) and position the rack in the lower middle of the oven. Once the rolls have finished proofing, brush them gently with whisked egg wash and sprinkle pumpkin seeds on top for texture and decoration. Bake for 30–35 minutes, or until the tops are a rich golden brown.
Pro Tip: If the tops brown too quickly, cover the pan with aluminum foil and continue baking until done. To test doneness, insert a skewer or cake tester into the center of a roll—it should come out clean.
As soon as they’re out of the oven, brush the tops with melted butter. This not only adds shine but also keeps the crust soft and inviting. For best results, carefully slide the rolls onto a wire rack to cool slightly before serving. This prevents condensation from forming underneath, which could make them soggy.
Baking Tips for Perfect Dinner Rolls
Oven Position & Temperature
One of the most overlooked details in baking is oven placement. For these gluten free pumpkin dinner rolls, position your rack on the lower-middle level. This allows the heat to circulate evenly around the rolls, baking them through without scorching the tops. Keep your oven preheated at 375°F (190°C)—a sweet spot for developing golden-brown crusts while ensuring the centers cook fully.
Pro Tip: Invest in an oven thermometer. Many ovens run hotter or cooler than their settings, which can make or break your bake.
Mastering the Egg Wash
Brushing the rolls with whisked egg before baking creates that beautiful, glossy finish you see in bakery bread baskets. For a deeper shine, brush once before baking and once halfway through. If you want a dairy-free alternative, unsweetened almond milk or oat milk brushed on top works surprisingly well, though the finish will be slightly more matte.
Keeping Rolls Moist and Fluffy
The biggest mistake in gluten free bread baking is adding too much flour. Remember, this dough is meant to be sticky. If it feels more like cookie dough than bread dough, you’ve gone too far. Trust the process—floured hands and a well-floured surface will make shaping manageable without compromising the final texture.
Another trick is brushing the freshly baked rolls with melted butter as soon as they come out of the oven. This locks in moisture and keeps the crust soft and tender. If you prefer a firmer crust, simply skip the butter wash.
Cooling for the Best Texture
Cooling might feel like the hardest part, especially when your kitchen smells like warm pumpkin bread. But resist tearing into them right away. Allowing the rolls to rest on a wire rack for at least 10–15 minutes ensures steam escapes without creating soggy bottoms. This short wait rewards you with rolls that are perfectly soft inside yet not gummy.
Troubleshooting: What If They Don’t Rise?
If your gluten free pumpkin dinner rolls don’t puff up, the culprit is usually yeast. Make sure it’s fresh and hasn’t expired. Also, remember yeast is a living organism—cold kitchens slow it down dramatically. To create the perfect proofing environment, place your pan in an oven that’s turned off but warmed slightly with a cup of boiling water inside. This provides the warm, humid atmosphere yeast loves.
Common Mistakes to Avoid
Adding Too Much Flour
This is by far the number-one mistake in gluten free bread baking. Because gluten free dough feels stickier than traditional wheat dough, many bakers panic and add extra flour. While it may feel easier to handle, the finished rolls will turn out dense, dry, and heavy. Remember: a sticky dough is a good dough here. Instead of flouring the dough itself, flour your hands and work surface generously to keep things manageable without changing the texture.
Rushing the Proofing Process
Proofing is where the magic happens. It gives yeast the time it needs to create air pockets, which makes your rolls light and fluffy. Skipping or shortening this step will leave you with rolls that taste gummy and underdeveloped. Always give your dough the full 1 to 1.5 hours to rise. If your kitchen is cold, create a warm environment by placing a mug of boiling water in the oven (turned off) and proofing your pan alongside it.
Not Kneading Enough
Many people assume gluten free dough doesn’t need much kneading since there’s no gluten to develop. But kneading still matters—it evenly distributes the psyllium gel and xanthan gum, both of which are critical for structure. Without enough kneading, you’ll get uneven textures with gummy spots. Spend at least 4–5 minutes in a stand mixer or 6–8 minutes by hand for the best results.
Overbaking or Underbaking
Because pumpkin puree adds moisture, these rolls can trick you into thinking they’re done before they really are. Underbaked rolls will be doughy in the center, while overbaked ones lose their pillowy softness. The sweet spot is about 30–35 minutes at 375°F, with a golden-brown top and a toothpick coming out clean. If in doubt, check with a food thermometer—the center should reach about 200°F.
Forgetting the Cooling Step
Pulling your gluten free pumpkin dinner rolls straight from the oven and leaving them in the hot pan is a recipe for soggy bottoms. Condensation builds up quickly underneath. Instead, carefully lift the rolls out of the pan and cool them on a wire rack. This simple step ensures they stay fluffy and light all the way through.
How to Store and Reheat Gluten Free Pumpkin Dinner Rolls
Storing at Room Temperature
Freshly baked gluten free pumpkin dinner rolls will keep well for 2–3 days at room temperature if stored properly. Place them in an airtight container or wrap them tightly in plastic wrap to prevent air exposure, which dries them out quickly. Unlike traditional wheat rolls, gluten free breads don’t stay soft as long, so sealing them tightly is key.
Pro Tip: Line the container with a sheet of parchment paper before stacking the rolls. This prevents them from sticking together if any moisture is present.
Refrigeration: Yes or No?
Many people instinctively pop bread into the fridge, but with gluten free rolls, that’s not always the best move. Refrigeration can dry them out faster. If you know you’ll finish them within two days, stick with room temperature storage. Only refrigerate if your kitchen is very warm or humid and you’re concerned about spoilage.
Freezing for Longer Storage
The good news is these pumpkin dinner rolls freeze beautifully. Once cooled completely, wrap each roll individually in plastic wrap, then place them in a freezer-safe bag. They’ll stay fresh for up to 2 months. When you’re ready to enjoy them, thaw at room temperature and reheat before serving.
Reheating for Freshness
Gluten free pumpkin dinner rolls taste best warm, almost as if they just came out of the oven. For quick reheating, place a roll in the microwave for 10–15 seconds. For larger batches, cover them loosely with foil and warm in a 300°F oven for about 10 minutes. The foil prevents the tops from over-browning while the heat gently restores their softness.
Pro Tip: Brush thawed or reheated rolls with a touch of melted butter to bring back that bakery-fresh shine and flavor.
Avoiding Sogginess During Storage
If you’ve ever had bread go soggy in storage, condensation is usually to blame. Make sure the rolls cool completely on a wire rack before sealing them in containers or wrapping them. Even a little trapped steam can make them gummy.
Creative Ways to Serve Pumpkin Dinner Rolls
A Holiday Showstopper
These gluten free pumpkin dinner rolls aren’t just bread—they’re a centerpiece. Imagine setting them on your Thanksgiving or Christmas table in a rustic basket lined with a linen napkin. Their golden-orange glow and pumpkin seed topping instantly give festive vibes. They pair beautifully with roast turkey, glazed ham, or prime rib, making them the perfect complement to hearty holiday spreads.
Pro Tip: Brush them with melted butter and sprinkle with fresh rosemary or sea salt flakes right out of the oven for an extra gourmet touch.
Soup and Stew Companions
On chilly fall and winter evenings, nothing beats a steaming bowl of soup with warm bread on the side. These rolls are an excellent partner to creamy pumpkin soup, classic chicken noodle, or a rich beef stew. Their slightly sweet pumpkin flavor balances savory broths beautifully, soaking up every last drop.
Sandwich Sliders
Because these gluten free pumpkin dinner rolls are pillowy-soft, they make excellent slider buns. Slice them in half and fill with roasted turkey, cranberry sauce, and a slice of brie for a holiday-inspired mini sandwich. For everyday meals, they’re perfect with pulled pork, chicken salad, or veggie patties.
Sweet Breakfast Twist
Who says dinner rolls are only for dinner? Toast leftover rolls lightly and spread with butter and honey, cinnamon sugar, or pumpkin spice cream cheese. They transform into a cozy breakfast treat that rivals muffins and bagels.
Everyday Side Dish
You don’t need a holiday to enjoy them. Serve gluten free pumpkin dinner rolls with weeknight dinners like roast chicken, pasta, or even chili. Their versatility makes them a family favorite, and since they freeze so well, you can keep a batch on hand for whenever cravings strike.
Expert Tips for Rolling Pumpkin Rolls Without Cracks
The Secret to Rolling Pumpkin Dough
When shaping or rolling pumpkin-based dough, the key is elasticity. Gluten free pumpkin dinner rolls don’t have gluten strands to give stretch, so you need the right binders to mimic that effect. Psyllium husk gel and xanthan gum work together to make the dough pliable. Without them, it would break apart easily. Proper kneading also strengthens the dough, making it smooth enough to roll and shape into beautiful dinner rolls.
Pro Tip: Always flour your surface generously. Gluten free dough tends to stick, and a lightly floured surface makes rolling easier without adding extra flour to the dough itself.
Preventing Cracks During Rolling
A common issue when shaping pumpkin rolls is cracking. This usually happens if the dough is too dry or hasn’t rested properly. To avoid cracks:
- Make sure your dough is sticky and hydrated before shaping.
- Allow the dough to rest after mixing—this gives the psyllium husk time to fully absorb water.
- Roll gently with light pressure, tucking the edges underneath to create smooth, round rolls.
If cracks do appear, don’t panic. Often they smooth out during proofing and baking as the rolls expand.
Avoiding Sogginess
Nobody wants soggy bread, and pumpkin puree can sometimes introduce too much moisture. To prevent sogginess:
- Always bake the rolls until golden brown and check with a skewer for doneness.
- Cool them on a wire rack immediately after baking. Leaving them in the pan traps steam, which creates soggy bottoms.
- Store them only after they’ve cooled completely.
Timing Is Everything
Rolling and shaping should be done once the dough has been kneaded but before the final proof. If you try shaping after the proof, the air pockets created by the yeast will collapse, and the rolls won’t rise properly in the oven. Aim for uniform sizes—about 70 grams per roll—so they bake evenly.
Pro Tip: If handling the dough feels tricky, chill it in the fridge for an hour before rolling. It firms up just enough to make shaping easier without affecting texture.
FAQs About Gluten Free Pumpkin Dinner Rolls
What is the secret to rolling a pumpkin roll?
The secret lies in moisture and flexibility. For pumpkin dinner rolls, keeping the dough slightly sticky ensures it stretches instead of cracking. Using psyllium husk and xanthan gum provides the elasticity gluten-free dough lacks. Always roll gently on a well-floured surface and tuck the edges under to create smooth, pillowy shapes.
How do I keep my pumpkin roll from getting soggy?
Sogginess often comes from trapped steam. After baking, transfer the rolls to a wire rack right away to release moisture. Make sure they’re fully baked—test with a toothpick to ensure no raw dough sticks. Finally, let them cool completely before storing in a sealed container.
What are the ingredients for a pumpkin roll?
Classic pumpkin rolls include flour, pumpkin puree, yeast, eggs, milk, oil, sugar, and salt. For a gluten free pumpkin dinner roll, you’ll swap in gluten free flours such as millet, sorghum, and tapioca starch, plus binders like psyllium husk and xanthan gum to achieve a soft, fluffy texture.
How to roll a pumpkin roll so it doesn’t crack?
The key is to roll while the dough is still pliable. Cracks form when dough is too dry or stiff. To avoid this:
Keep the dough hydrated.
Let the psyllium gel rest before mixing.
Handle gently and avoid pressing too hard.
If cracks appear, proofing often smooths them out before baking.
Gluten free pumpkin dinner rolls prove that baking without wheat doesn’t mean sacrificing flavor or texture. With their golden-orange color, soft and fluffy crumb, and subtle pumpkin sweetness, these rolls can brighten any meal—from weeknight soups to festive holiday feasts. The key to success is balancing hydration, using the right flour blend, and giving the dough the care it needs during kneading and proofing. Follow these expert tips and your rolls will come out pillowy, flavorful, and anything but ordinary.
Whether you’re baking for family with gluten sensitivities, experimenting with holiday recipes, or simply craving something cozy, these rolls deliver comfort in every bite. Don’t be surprised if they become your new go-to side dish year-round.
Print
Gluten Free Pumpkin Dinner Rolls
These gluten free pumpkin dinner rolls are pillowy-soft, fluffy, and golden orange thanks to pumpkin puree. Perfectly tender and slightly sweet, they make an amazing side dish for holiday gatherings or cozy weeknight dinners.
- Total Time: 2 hours 30 minutes
- Yield: 16 rolls
Ingredients
For the Gluten Free Pumpkin Brioche Dough:
20 g (4 tbsp) whole psyllium husk (17 g if using powder)
240 g (1 cup) lukewarm water
230 g (2 cups) tapioca starch (or cornstarch/potato starch/arrowroot)
135 g (1 cup) millet flour (or finely ground brown rice flour)
60 g (⅓ cup + 2 tbsp) sorghum flour (or oat, light buckwheat, or teff flour)
50 g (¼ cup) sugar
8 g (2½ tsp) instant yeast (10 g if using active dry yeast)
8 g (2 tsp) baking powder
7 g (2¾ tsp) xanthan gum
12 g (2 tsp) salt
125 g (½ cup) canned pumpkin puree
80 g (⅓ cup) whole milk, lukewarm (reduce to 60 g for easier handling)
2 large eggs, room temperature
40 g (3 tbsp) sunflower oil (or neutral oil)
For Topping:
1 egg, whisked (for brushing)
2–3 tbsp pumpkin seeds (for sprinkling)
1–2 tbsp melted salted butter (for brushing after baking)
Instructions
1. Make psyllium gel: whisk psyllium husk with lukewarm water. Let sit until gel forms.
2. Mix dry ingredients: tapioca starch, millet flour, sorghum flour, sugar, yeast, baking powder, xanthan gum, and salt.
3. Combine wet ingredients: pumpkin puree, milk, eggs, oil with psyllium gel. Mix smooth.
4. Make dough: add wet to dry. Knead 4–5 min with stand mixer (or 6–8 min by hand). Dough should be soft and sticky.
5. Shape rolls: divide dough into 16 pieces (~70 g each). Shape into balls. Arrange in greased 9-inch pan (4×4 grid).
6. Proof: cover lightly. Let rise 1 hr 15 min – 1 hr 30 min until doubled.
7. Bake: preheat oven 375°F (190°C). Brush with egg wash, sprinkle with pumpkin seeds. Bake 30–35 min until golden and cooked through.
8. Finish: brush hot rolls with melted butter. Cool on wire rack. Serve warm or room temperature.
Notes
Storage & Reheating:
– Store in airtight container at room temperature 2–3 days.
– Reheat in microwave 10–15 seconds for fresh-baked softness.
Tips:
– Use psyllium husk (not powder) for best texture.
– Proof in a warm oven with a mug of hot water for fluffy results.
– Can freeze baked rolls for up to 2 months; thaw and rewarm before serving.
- Prep Time: 45 minutes
- Cook Time: 30 minutes
- Cuisine: Gluten Free
- Diet: Gluten Free