
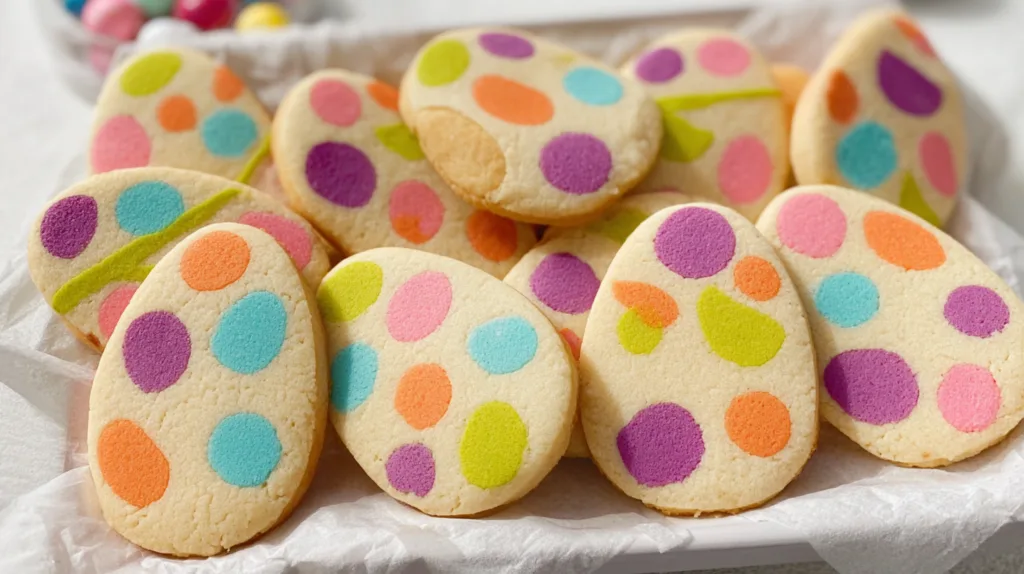
Easter is a time for celebration, spring colors, and, most importantly, delightful treats that capture the magic of the season. While we all love the look of intricate, hand-iced sugar cookies, not everyone has the hours required to master royal icing or the patience for multiple drying stages. That is where these Patterned Easter Egg Sugar Cookies come in. Using a brilliant “inlay” technique with neon-colored dough and a reliable cookie mix shortcut, you can achieve a professional, multi-colored look in a fraction of the time. These cookies aren’t just easy to make; they are visually stunning, featuring smooth, vibrant patterns baked right into the surface. Whether you are hosting an Easter brunch or looking for a fun kitchen project with the kids, these cookies are guaranteed to be the star of the show.
Why You’ll Love This Recipe
You will fall in love with this recipe because it balances high-impact visual appeal with low-stress preparation. By using Betty Crocker™ Sugar Cookie Mix as a base, you eliminate the guesswork of measuring dry ingredients while ensuring a consistent, delicious flavor every time. The “parchment press” technique allows you to create modern, geometric, or whimsical patterns without needing any specialized decorating tools. Furthermore, because the design is part of the dough itself, these cookies are incredibly easy to transport to parties or school events—no worrying about smudging delicate frosting or layers of icing sticking together in a container. It is the perfect blend of convenience and creativity.
What Is a Patterned Sugar Cookie?
A patterned sugar cookie, often called a “printed” or “inlay” cookie, is a technique where two or more different colors of dough are pressed together before cutting and baking. Unlike traditional cookies where decorations are added after the oven, these designs are integrated into the structure of the cookie. By rolling small pieces of dyed dough into a neutral base, you create a flat, seamless surface with a “marbled” or “designer” effect. This method is highly popular in modern baking because it results in a clean, sophisticated aesthetic that highlights the vibrant neon colors against the soft, buttery background of the sugar cookie.
Ingredients Overview
The beauty of this recipe lies in its simplicity. To get started, you will need:
- 1 Pouch (17.5 oz) Betty Crocker™ Sugar Cookie Mix: This provides the perfect ratio of sugar, flour, and leavening agents for a soft yet sturdy cookie.
- 1/2 Cup Butter, Softened: Ensure your butter is at room temperature. It should be soft enough to indent with your finger but not so soft that it is greasy or melting.
- 3 Tablespoons Gold Medal™ All-Purpose Flour: This extra bit of flour is crucial. It adds just enough structural integrity to the dough so that it holds the egg shape perfectly and doesn’t spread too much during the baking process.
- 1 Large Egg: This acts as the binder, bringing the fat and dry mix together into a cohesive dough.
- Betty Crocker™ Neon Gel Food Colors: Gel colors are superior to liquid drops for this recipe because they provide intense, saturated hues without thinning out the small portions of dough. The neon palette (pink, orange, blue, and green) creates a contemporary Easter look.
Ingredient Substitutions & Tips
If you don’t have a pouch of sugar cookie mix on hand, you can substitute your favorite “no-spread” homemade sugar cookie recipe, though you may need to adjust the chilling time. For a dairy-free version, use a high-quality plant-based butter stick (ensure it is the kind meant for baking, not a tub spread). If you prefer a more classic look, you can swap the neon gel colors for traditional pastel shades. A pro tip: if your dough feels too sticky while working with the colors, add a tiny pinch of extra flour to the colored portions to keep them manageable.
Step-by-Step Instructions
- Prepare the Base: In a large mixing bowl, combine the sugar cookie mix, softened butter, 3 tablespoons of flour, and the egg. Using a hand mixer or a sturdy spatula, stir until a thick, uniform dough forms. It should pull away from the sides of the bowl.
- Separate and Chill: Take 1/2 cup of the prepared dough and set it aside. Wrap the remaining large portion of dough in plastic wrap and place it in the refrigerator. Chilling the base dough makes it much easier to roll out cleanly.
- Color the Patterns: Divide your reserved 1/2 cup of dough into four equal small portions. Add a drop or two of the neon gel food colors to each portion. Knead the color in by hand until it is vibrant and streak-free.
- Roll the Base: Preheat your oven to 375°F. On a lightly floured surface, roll out your chilled base dough until it is about 3/16-inch thick.
- Create the Art: Take small bits of your colored doughs. Roll them into thin ropes, tiny spheres, or flatten them into small zigzags. Randomly or systematically place these colored shapes onto your rolled-out base dough.
- The Parchment Press: Place a sheet of parchment paper over the top of the dough. Gently run your rolling pin over the parchment. This presses the colored designs into the base dough, creating a single, flat sheet of patterned dough.
- Cut the Shapes: Use a 2 1/2-inch oval cookie cutter to cut “eggs” from the dough. Try to space your cuts to capture the best patterns.
- Chill and Bake: Place the cut eggs on a cookie sheet. Refrigerate the entire sheet for 15 minutes. This is a vital step to ensure they keep their oval shape. Bake for 8 to 10 minutes. The cookies should look dry on top but not browned.
Expert Baking Tips
To ensure your cookies look like they came from a high-end bakery, follow these expert tips. First, always use a “cold pan” for each batch; if you place dough on a hot cookie sheet from a previous batch, the bottoms will spread instantly. Second, when rolling the colored dough, keep the patterns relatively thin. If the “ropes” are too thick, they may distort the shape of the egg when you press them in. Finally, if you find the dough sticking to your cookie cutter, dip the cutter in a little bit of flour between every few cuts for a clean, sharp edge.
Special Section: Creative Pattern Ideas
The neon gel colors offer endless possibilities for creativity. For a Polka Dot Egg, roll tiny balls of neon blue and pink and space them evenly. For a Marbled Egg, take the scraps from your first round of cutting, gently knead them together once or twice (don’t overmix!), and roll them back out; the colors will swirl together beautifully. You can also create Chevron Eggs by laying down small V-shaped pieces of colored dough. Because the dough is so forgiving, you can experiment with different styles on the same sheet before you ever hit the oven.
Serving Suggestions
These cookies are a standout addition to any Easter dessert platter. Serve them alongside fresh strawberries and a light lemon curd dip for a refreshing spring treat. For a kid-friendly presentation, tuck them into individual cellophane bags tied with a pastel ribbon and place them inside Easter baskets. They also pair wonderfully with a cold glass of milk or a festive pink lemonade during a holiday lunch.
Storage & Make-Ahead Tips
These cookies stay fresh and delicious for up to 5 days when stored in an airtight container at room temperature. If you want to get ahead of the holiday rush, you can freeze the baked cookies for up to 3 months. Simply thaw them at room temperature for an hour before serving. You can also make the dough and color it up to 2 days in advance—just keep it well-wrapped in the fridge until you are ready to roll.
FAQs
Can I use liquid food coloring instead of gel?
It is not recommended. Liquid food coloring adds too much moisture to the dough, which can make the colored portions sticky and difficult to handle. Gel colors provide much more pigment without changing the consistency of the dough.
Why do I need to add extra flour to the mix?
The extra 3 tablespoons of flour help the cookies hold their “egg” shape. Sugar cookie mixes are often designed to be soft, but for cutout cookies with intricate patterns, a slightly firmer dough prevents the designs from blurring during the bake.
My cookies spread too much. What happened?
This usually happens if the dough was too warm when it went into the oven. Make sure you don’t skip the 15-minute chilling step after you’ve cut the egg shapes.
Can I use this technique with other shapes?
Absolutely! This patterned dough technique works for any holiday. Try stars for the 4th of July or hearts for Valentine’s Day.
What should I do with the leftover colored scraps?
Don’t throw them away! Roll the scraps together to create “galaxy” or “marble” cookies. They often end up being the most popular ones on the tray because of their unique look.