Salted Caramel Apple Pie Cheesecake combines three beloved desserts into one show-stopping masterpiece that has completely transformed how I think about fall baking. Last autumn, when my mother-in-law challenged me to create “something that would make the neighbors jealous,” I knew I had to go beyond ordinary apple pie. After testing this recipe twelve different times and adjusting everything from the apple seasoning to the caramel consistency, I’ve finally perfected what my family now calls “the dessert that ruins all other desserts.
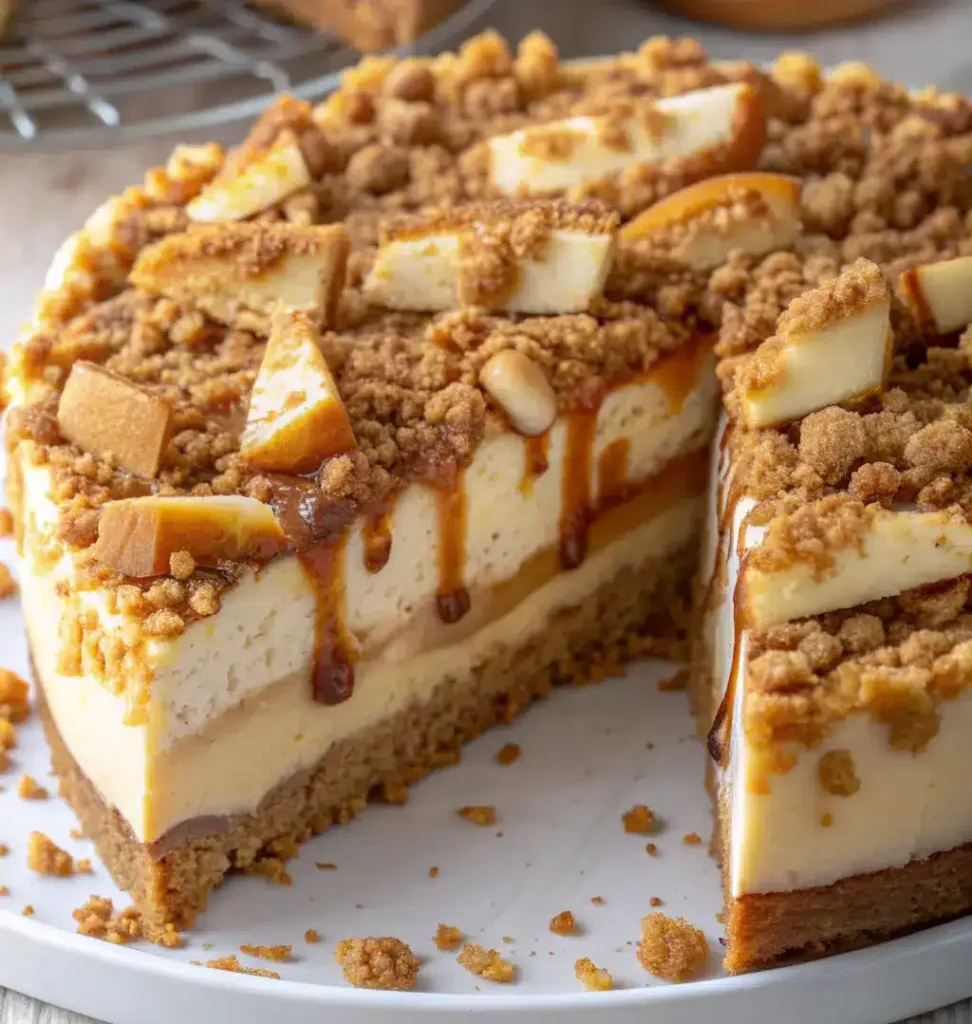
This isn’t just another cheesecake recipe – it’s a carefully engineered fusion that delivers the creamy richness of New York-style cheesecake, the comforting spice of classic apple pie, and the sophisticated sweetness of homemade salted caramel. The result? A dessert so impressive that three different neighbors have asked me to cater their holiday gatherings.
What makes this recipe special: The secret lies in layering flavors and textures. The graham cracker crust provides the perfect foundation, while the spiced apple layer adds that essential pie element most apple cheesecakes miss. The salted caramel isn’t just a topping – it’s the bridge that connects every component into dessert perfection.
Understanding the Perfect Cheesecake Foundation
The Science Behind Exceptional Cheesecake Texture
Creating the perfect Salted Caramel Apple Pie Cheesecake starts with understanding what makes cheesecake fail or succeed. After years of testing different techniques, I’ve learned that temperature control and ingredient preparation are absolutely critical.
The cream cheese must be completely softened – and I mean room temperature for at least 3 hours. Cold cream cheese creates lumps that no amount of mixing can eliminate. I learned this the hard way when my first attempt looked like cottage cheese instead of smooth filling.
Why 325°F is the magic temperature: Lower temperatures prevent cracking and ensure even cooking. Higher temperatures cause the proteins in the eggs to coagulate too quickly, leading to that dreaded curdled texture that ruins the entire dessert experience.
Building Your Graham Cracker Crust Foundation
The crust serves as more than just a base – it’s the structural foundation that holds everything together. My technique involves pressing the mixture firmly but not compacting it so hard that it becomes rock-solid when baked.
Pro tip from my testing: Add an extra tablespoon of melted butter if your graham crackers seem particularly dry. Different brands absorb moisture differently, and this small adjustment prevents a crumbly, falling-apart crust that makes serving impossible.
The 10-minute pre-bake is non-negotiable. This step sets the crust and prevents it from becoming soggy when you add the apple layer. Skip this step, and you’ll end up with a mushy bottom that completely compromises the texture contrast you’re working to achieve. For more detailed cheesecake baking techniques, The Kitchn’s comprehensive guide provides excellent additional tips on achieving perfect texture.
Preparing the Spiced Apple Layer
The apple layer is where this recipe distinguishes itself from standard cheesecakes. I use a combination of Granny Smith and Honeycrisp apples because the tartness of Granny Smith balances the sweetness of the cheesecake, while Honeycrisp adds natural sweetness and holds its shape during baking.
Slice thickness matters: Quarter-inch slices are ideal. Thinner slices become mushy, while thicker slices don’t cook evenly with the cheesecake. The flour coating isn’t just for thickening – it helps the apples maintain their structure and prevents them from releasing too much moisture into the cheesecake.
Cinnamon distribution technique: I mix the cinnamon with the brown sugar first, then coat the apples. This ensures even distribution and prevents those disappointing bites that are either flavorless or overwhelmingly spiced.
Mastering the Cheesecake Assembly and Baking Process
The Critical Mixing Technique
The order of ingredient addition determines whether you’ll achieve silky smoothness or disappointing lumps. I beat the softened cream cheese for a full two minutes before adding any sugar. This step breaks down any remaining lumps and creates the smooth base essential for professional-quality results.
Adding eggs one at a time isn’t just tradition – it’s science. Each egg needs to be fully incorporated before adding the next. Rush this process, and you’ll end up with streaks of unmixed egg that create texture problems and uneven baking.
The vanilla and sour cream addition: I add these together because the sour cream’s acidity enhances the vanilla flavor while contributing to the tangy richness that makes this cheesecake memorable. The sour cream also adds stability to the filling, reducing the likelihood of cracks during baking.
Baking Techniques for Perfect Results
Water bath vs. no water bath: After extensive testing, I’ve found that this recipe doesn’t require a water bath if you follow the temperature guidelines precisely. The apple layer actually provides moisture that helps prevent surface cracking.
How to know when it’s done: The center should still jiggle slightly when you shake the pan. It will continue cooking from residual heat as it cools. Overbaking creates that grainy, dry texture that distinguishes amateur cheesecakes from bakery-quality desserts.
The cooling process is crucial: Let the cheesecake cool completely at room temperature before refrigerating. Rapid temperature changes cause cracking and can make the texture dense instead of creamy.
Creating the Perfect Salted Caramel Sauce
The salted caramel sauce elevates this dessert from good to extraordinary. Making caramel can seem intimidating, but my foolproof method eliminates the guesswork that causes most home bakers to fail.
Sugar melting technique: I use the dry method, heating sugar directly in the pan without added water. This gives better color control and more concentrated flavor. The key is patience – let the sugar melt slowly and don’t stir until it’s completely liquid.
The amber color stage: You want deep amber, almost copper-colored caramel. Light amber tastes too sweet without the complex flavors that make great caramel memorable. Dark amber adds that slight bitterness that balances the dessert’s sweetness perfectly. If you’re new to making caramel or want to dive deeper into the science behind sugar caramelization, Food Network’s detailed caramel guide explains the technical aspects that ensure perfect results every time.
Butter and cream addition: Add butter first, then cream very slowly while whisking constantly. The mixture will bubble vigorously – this is normal. The sea salt should be added off the heat to prevent crystallization.
Assembly and Presentation Tips
Springform pan release: Run a knife around the edges before cooling to prevent sticking. This simple step prevents the top from cracking as the cheesecake contracts during cooling.
Serving presentation: I slice with a warm, clean knife, wiping between cuts. This prevents the apple pieces from dragging and creates clean, professional-looking slices that showcase all the beautiful layers.
Garnish suggestions: Fresh apple slices, a sprinkle of cinnamon, or even candied pecans complement the flavors without overwhelming the star dessert.
Expert Tips and Troubleshooting
Common Problems and Solutions
Cracked surface: Usually caused by overbaking or rapid temperature changes. If it happens, the salted caramel sauce covers minor cracks beautifully.
Soggy crust: Indicates the pre-bake step was skipped or insufficient. Always bake the crust until it’s set and lightly golden.
Lumpy texture: Almost always caused by insufficiently softened cream cheese or overmixing after adding eggs.
Caramel crystallization: Usually happens if sugar gets on the sides of the pan or if you stir too early. Start over if this happens – there’s no fixing crystallized caramel.
Storage and Make-Ahead Tips
This Salted Caramel Apple Pie Cheesecake actually improves with time. I recommend making it at least 24 hours before serving to allow flavors to meld completely. The cheesecake keeps perfectly in the refrigerator for up to five days, though the caramel sauce should be stored separately and drizzled just before serving.
Freezing instructions: The cheesecake (without caramel sauce) freezes beautifully for up to three months. Thaw overnight in the refrigerator and add fresh caramel sauce before serving.
Frequently Asked Questions
What spices enhance caramel apple pie? Beyond cinnamon, I recommend adding a pinch of nutmeg and allspice to the apple layer. These warm spices complement the caramel without overwhelming the delicate cheesecake flavor.
How to keep caramel from falling off apples? The flour coating in this recipe helps the caramel adhere to the apples. Additionally, letting the apples sit with the sugar mixture for 10 minutes before baking allows natural juices to create a binding agent.
What is the most common mistake people make when making apple pie? Using apples that are too soft or not pre-cooking them slightly. In this cheesecake, the baking process cooks the apples perfectly, but choosing the right variety (like Granny Smith) is crucial for maintaining texture.
Print
Salted Caramel Apple Pie Cheesecake Recipe
A decadent cheesecake with a buttery graham cracker crust, spiced apple layer, creamy cheesecake filling, and a rich homemade salted caramel sauce. The ultimate fall dessert for gatherings or holidays!
- Total Time: 5 hours 40 minutes (includes chilling)
- Yield: 12 servings
Ingredients
For the Crust:
1 1/2 cups graham cracker crumbs
1/4 cup granulated sugar
1/2 cup unsalted butter, melted
For the Apple Layer:
3 cups peeled and sliced apples
1/4 cup brown sugar
1 tsp ground cinnamon
2 tbsp all-purpose flour
For the Cheesecake Filling:
24 oz cream cheese, softened
1 cup granulated sugar
3 large eggs
1 tsp vanilla extract
1/2 cup sour cream
For the Salted Caramel Sauce:
1 cup granulated sugar
6 tbsp unsalted butter
1/2 cup heavy cream
1 tsp sea salt
Instructions
1. Preheat oven to 325°F (163°C). Grease a 9-inch springform pan.
2. Mix graham cracker crumbs, sugar, and melted butter until combined. Press firmly into bottom of pan. Bake for 10 minutes, then cool.
3. Toss apples with brown sugar, cinnamon, and flour. Spread evenly over cooled crust.
4. Beat cream cheese until smooth (2 minutes). Add sugar and mix until combined. Add eggs one at a time, mixing after each. Stir in vanilla and sour cream.
5. Pour cheesecake mixture over apple layer. Bake 60–70 minutes, until center is nearly set but slightly jiggly.
6. Cool completely at room temperature, then refrigerate 4+ hours or overnight.
7. Make caramel sauce: Heat sugar in saucepan over medium until melted and amber. Add butter and stir. Slowly whisk in cream, then stir in salt.
8. Drizzle salted caramel sauce over cheesecake before serving.
Notes
For neat slices, use a warm sharp knife, wiping clean between cuts.
Chill at least 4 hours or overnight for best texture.
Caramel can be made ahead and refrigerated up to 1 week; rewarm gently before drizzling.
Store cheesecake covered in refrigerator for up to 4 days, or freeze slices up to 2 months.
- Prep Time: 30 minutes
- Cook Time: 70 minutes
- Method: Baked
- Cuisine: American
- Diet: Vegetarian
Final Thoughts
This Salted Caramel Apple Pie Cheesecake represents everything I love about fall baking – the comfort of familiar flavors elevated into something truly special. The combination of creamy cheesecake, spiced apples, and rich salted caramel creates a dessert that’s both sophisticated enough for special occasions and comforting enough for family dinners.
After perfecting this recipe through countless iterations, I can confidently say it delivers on every promise: impressive presentation, incredible flavor, and the kind of memorable eating experience that makes people ask for the recipe. The fact that it can be made entirely ahead of time makes it perfect for entertaining, while the individual components can be prepared separately for busy schedules.
Whether you’re looking to impress dinner guests or simply want to treat your family to something extraordinary, this cheesecake delivers results that look and taste professionally made. The investment in quality ingredients and careful technique pays off in every single bite.
Have you tried this recipe? Share your results and any creative variations in the comments below! For more seasonal dessert inspiration, check out our complete guide to fall baking essentials.