Not Yo Mama’s Banana Pudding is the banana pudding recipe you didn’t know you were missing—richer, fluffier, and way more indulgent than your grandma’s version. This no-bake Southern dessert classic is taken to the next level with layers of creamy French vanilla pudding, whipped topping, tangy cream cheese, fresh bananas, and crispy vanilla wafers. Whether you’re making it for a holiday, potluck, or just a weeknight treat, Not Yo Mama’s Banana Pudding promises to be the show-stopping highlight of the table.
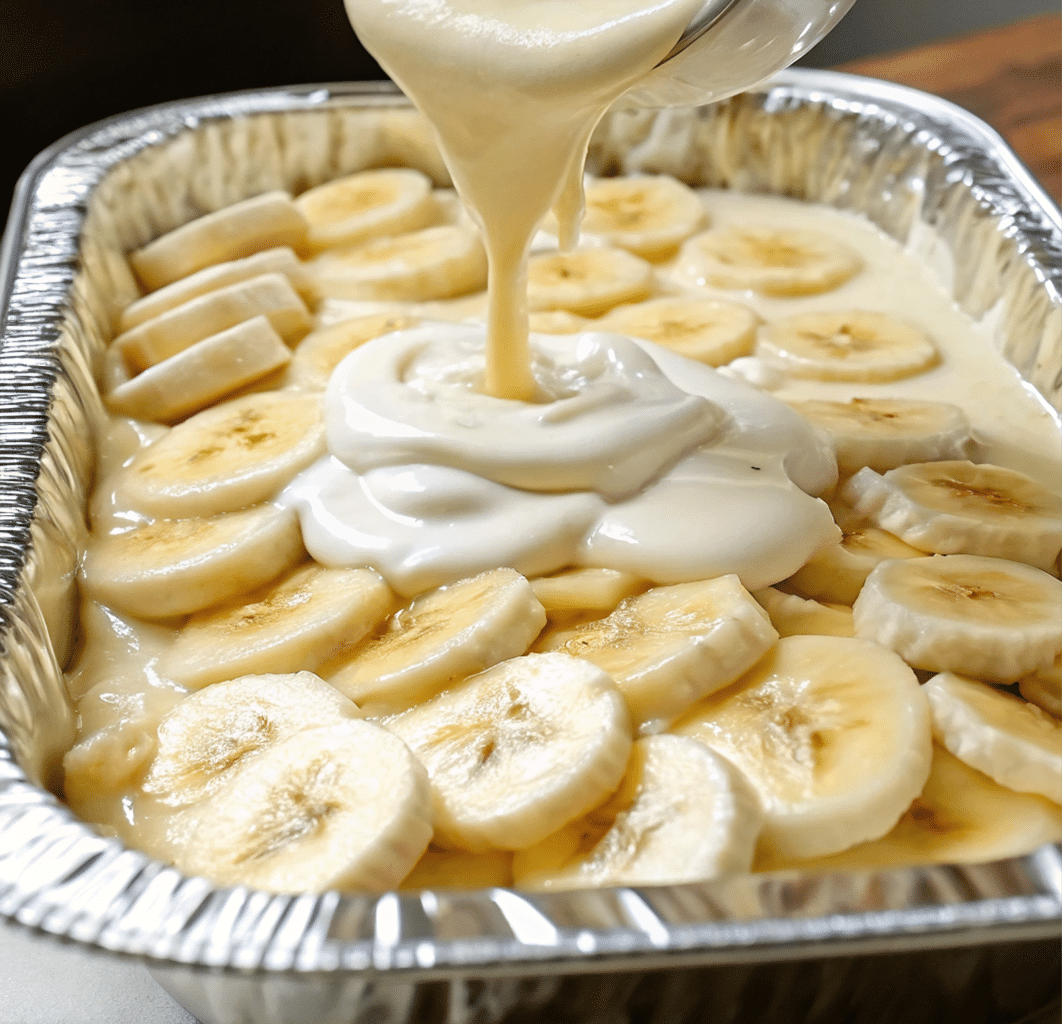
This post covers everything: the origins of the “Not Yo Mama” name, key ingredients, step-by-step prep, and expert tips on making it thicker, fresher, and prettier. You’ll even find solutions to common pudding problems—like runny layers or browning bananas. Looking for inspiration? Try our No-Bake Boston Cream Cake Recipe for another layered dessert hit.
Table of Contents
What Is Not Yo Mama’s Banana Pudding?
Origins of This Unique Dessert Name
If you’ve ever heard the phrase “Not Yo Mama’s,” you already know it implies a bold, updated take on a beloved classic. This dessert gained fame thanks to celebrity chefs and viral food blogs, but its foundation remains Southern comfort at heart. Traditional banana pudding is made with cooked custard and meringue—but this upgraded version skips the stove altogether and swaps in more decadent ingredients.
The name signals a departure from old-school. Instead of basic pudding from a box and store-bought whipped cream, we’re talking a thick, cheesecake-like filling that delivers pure satisfaction. Think creamy, rich, layered, and no cooking involved.
This dessert quickly became a fan-favorite on TikTok and food blogs, known for its easy prep and luscious texture. Plus, it holds up in the fridge and can be made ahead of time—score!
Why It’s Not Like Traditional Banana Pudding
Let’s break it down:
| Feature | Traditional Banana Pudding | Not Yo Mama’s Version |
|---|---|---|
| Cooking Required? | Yes (custard on stovetop) | No (mix & layer only) |
| Flavor Base | Basic vanilla pudding | French vanilla pudding |
| Texture | Light, meringue-topped | Creamy, cheesecake-like |
| Sweetness | Mild | Rich and sweet (with condensed milk) |
| Added Ingredients | Simple custard and wafers | Cream cheese + whipped topping |
Instead of making custard, Not Yo Mama’s Banana Pudding combines French vanilla mix, almond milk, whipped topping, and cream cheese—creating a light and fluffy base with rich flavor. Then it’s all about layering it between banana slices and vanilla wafers, just like the original Not Yo Mama’s Banana Pudding recipe calls for. The result is a melt-in-your-mouth dessert that’s easy enough for weeknights but elegant enough to serve guests, especially when you’re craving a no-bake twist on classic banana pudding.
Want to pair it with something warm and savory? Discover great ideas like our Homemade Yeast Rolls Recipe for a perfect Southern combo!
Ingredients That Set It Apart
The Power of French Vanilla vs. Regular Vanilla Pudding
One of the biggest flavor boosters in Not Yo Mama’s Banana Pudding is using French vanilla pudding instead of regular vanilla. While both add sweetness and structure, French vanilla has a richer, creamier taste thanks to the egg yolks used in its base. It adds depth that complements the bananas and vanilla wafers beautifully.
Regular vanilla pudding is still an option, but if you’re aiming for a restaurant-quality dessert, French vanilla is the way to go. It’s smoother, more luxurious, and balances well with the tanginess of the cream cheese.
Looking for more creamy ideas? Don’t miss our Creamy Custard Recipe—perfect for dessert lovers seeking next-level textures.
Key Comparison:
| Type | Texture | Flavor Profile |
|---|---|---|
| French Vanilla | Creamy & thick | Deep, custardy, rich |
| Regular Vanilla | Light & basic | Simple, sweet |
So if you’re wondering: Can you use French vanilla pudding for banana pudding? The answer is yes—and you should.
Why Cream Cheese and Whipped Topping Change Everything
This recipe stands out thanks to two unexpected—but game-changing—ingredients: cream cheese and whipped topping.
- Cream Cheese adds body and a slight tang. It thickens the pudding mixture while giving it a rich, cheesecake-like texture. It also helps keep the pudding from becoming runny.
- Whipped Topping (like Cool Whip) makes the mixture fluffy and smooth. It brings airiness and keeps everything light despite the richness of the ingredients.
When blended with sweetened condensed milk and pudding, these elements form a dessert base that’s both stable and indulgent. That creamy combo is exactly what makes Not Yo Mama’s Banana Pudding so popular on social media—it looks good, tastes even better, and holds up beautifully for hours, making it ideal for parties, potlucks, or anytime you need a foolproof no-bake treat.
Quick tip: Let your cream cheese soften before you mix it in. If it’s too cold, it’ll get lumpy and mess up that smooth texture you’re going for.
You’ll find yourself going back for seconds—maybe even thirds.
Prefer a traditional approach? See how Taste of Home builds banana pudding from scratch with eggs and flour in this classic version.
PART 3: Step-by-Step Recipe Instructions
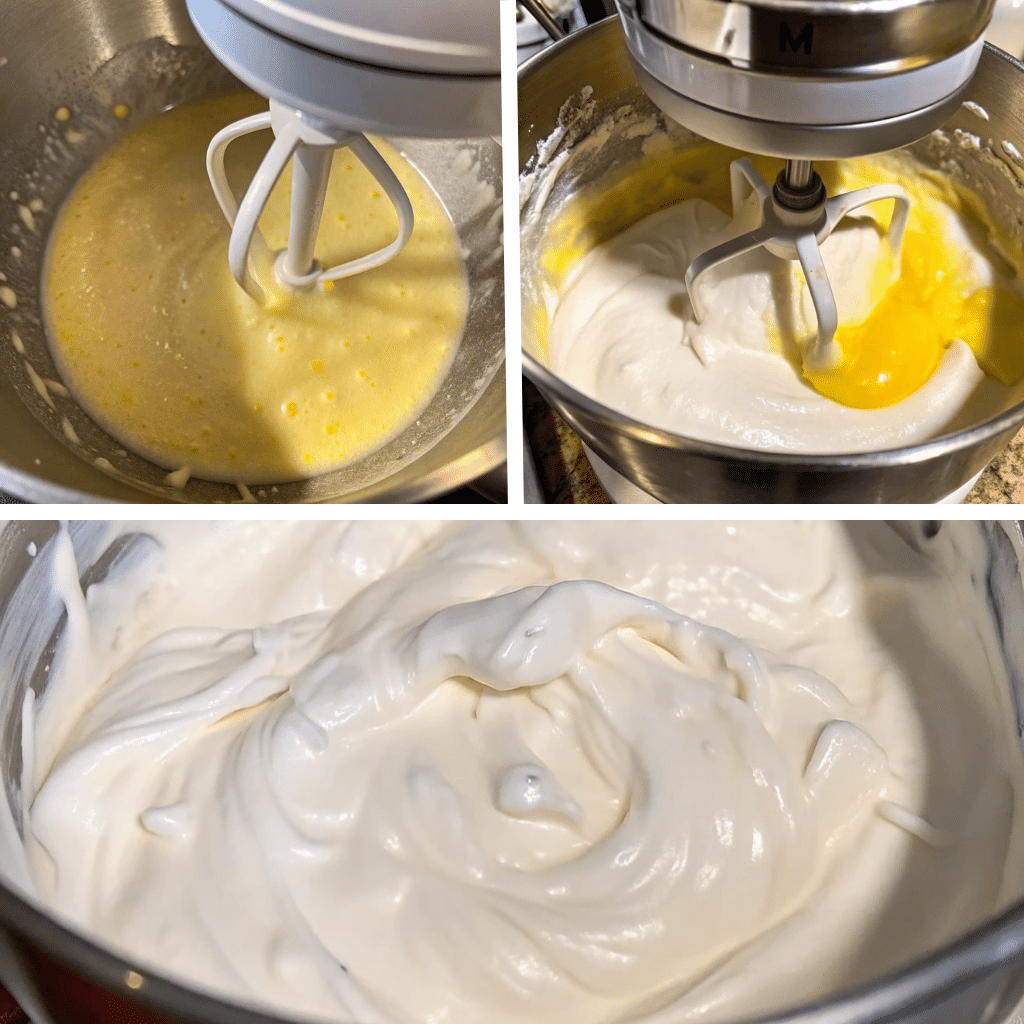
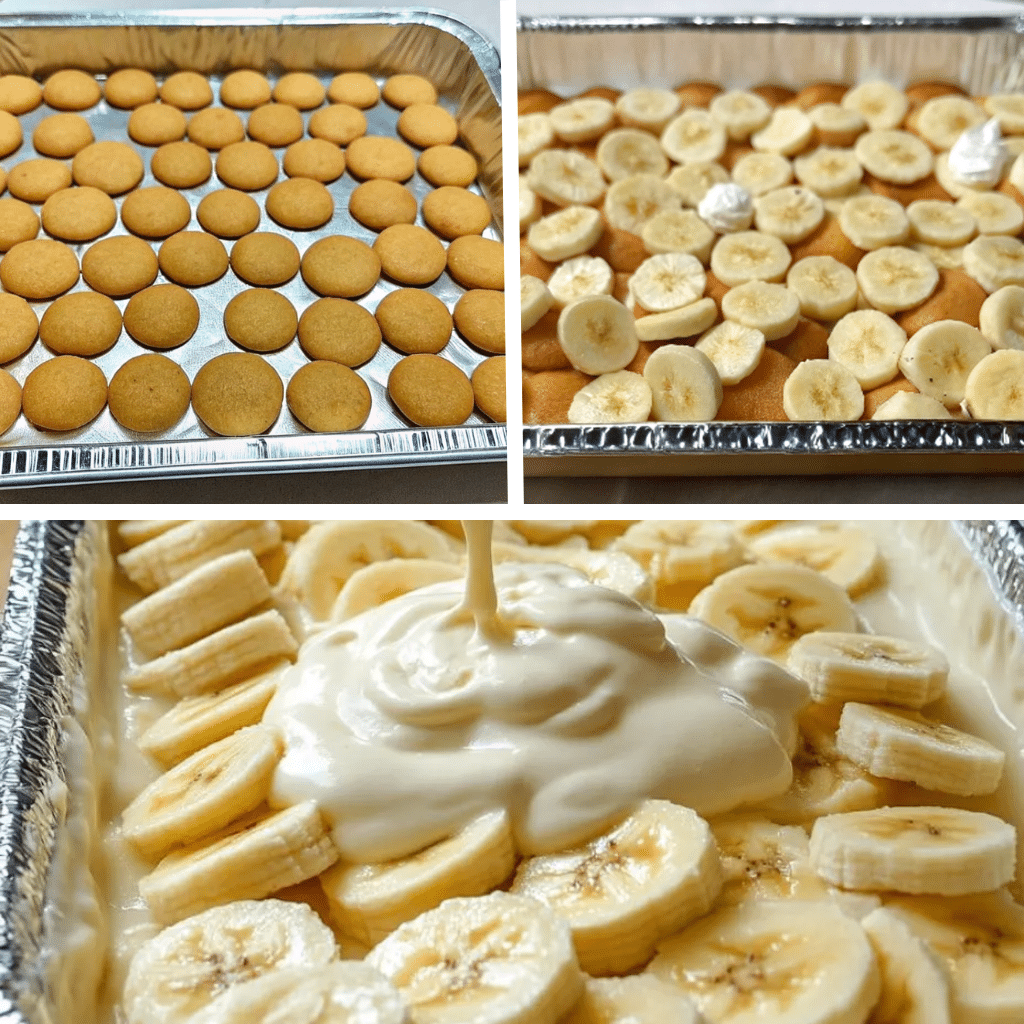
Making Not Yo Mama’s Banana Pudding is as simple as layering—but it’s the order and technique that matter. Here’s a foolproof walkthrough to help you create this decadent dessert with perfect consistency every time.
Preparing the Vanilla Wafer Base
Start with a 13×9-inch pan that’s at least 2 inches deep. This gives your pudding enough room to layer properly.
- Layer the bottom with a single row of vanilla wafers.
- Make sure they touch but don’t overlap too much.
- Don’t crush them—whole cookies help hold structure.
- Add the banana slices (6 to 8 ripe bananas).
- Place them evenly over the cookie base.
- You can use more or less depending on how banana-forward you want the flavor.
Pro Tip: Choose bananas that are ripe but still firm to avoid mushiness in your pudding layers.
Crafting the Creamy Pudding Filling
You’ll need two separate mixing bowls for this:
Bowl 1: Pudding Mix
- Combine 2 cups milk (or almond milk) with 1 (5 oz) box of French vanilla pudding mix.
- Whisk until thickened (about 2–3 minutes).
Bowl 2: Cream Cheese Mixture
- In a large bowl, blend 8 oz cream cheese and 14 oz sweetened condensed milk until smooth.
- Fold in 12 oz whipped topping gradually using a spatula. Folding helps trap air and keeps the texture fluffy. Think of it as gently turning the mixture in circles—no vigorous mixing!
Once both mixtures are ready:
- Pour the pudding into the cream cheese mixture.
- Mix thoroughly so no streaks remain.
- Be sure to scrape the sides and bottom to ensure even blending.
- Pour the creamy mixture over the banana and wafer layer in your pan.
- Spread evenly with a spatula.
- Top it off with another layer of vanilla wafers for crunch and presentation.
You can dig in right away, but it tastes even better if you chill it for a couple of hours or leave it in the fridge overnight. It sets up nicely and the flavor gets a boost.
Don’t miss our nostalgic twist on fruit pies in the Meet Rock Bottom Pie—another easy, layered favorite!
Secrets for the Perfect Texture
There’s nothing worse than digging into a banana pudding that’s soupy or heavy. One of the most common complaints? “Why is my banana pudding so runny?” The good news: with the right methods, your pudding can be both thick and fluffy—just like the original Not Yo Mama’s Banana Pudding.
How to Make Banana Pudding Thicker Without Ruining It
If your banana pudding turns out too thin, don’t worry—it’s fixable. The key lies in how you mix and chill the ingredients.
1. Use Full-Fat Cream Cheese
Low-fat versions won’t firm up the mixture the same way. The fat content gives body and helps the pudding “set.”
2. Whisk the Pudding Properly
Under-whisking the French vanilla pudding with milk can leave it watery.
- Use cold almond or whole milk, and whisk until the pudding holds its shape when scooped.
3. Chill Before Serving
Letting the pudding chill for at least 2 hours (preferably overnight) helps it firm up naturally. The wafers also absorb some moisture, making the layers more cohesive.
4. Don’t Overload with Bananas
While bananas add flavor, using too many can introduce excess moisture, especially if they’re overripe. Stick to 6–8 bananas that are firm and just ripe.
Mixing vs. Folding: Why It Matters in This Recipe
Most recipes say “mix everything together”—but not this one. Folding is your golden ticket to keeping the pudding cloud-like and creamy.
What’s the Difference?
| Technique | Tool | Purpose |
|---|---|---|
| Mixing | Whisk or beater | Incorporates air & ingredients |
| Folding | Spatula | Gently combines without deflating |
Here’s how to fold properly:
- Take a spatula and scoop from the bottom of the bowl.
- Lift the mixture and fold it over the top.
- Rotate the bowl as you go to incorporate everything slowly.
This technique keeps the whipped topping fluffy and gives your banana pudding that signature mousse-like texture.
Want another dish that nails the perfect mouthfeel? Check out our Charcuterie Nachos for creamy, crunchy balance done right.
Flavor Boosters & Variations
One of the best things about Not Yo Mama’s Banana Pudding is how easy it is to make it your own. You can boost the banana flavor, toss in something crunchy, or dress it up to wow a crowd—it’s totally up to you.
How to Jazz Up Banana Pudding with Extra Flavor
So, how do you take this pudding from delicious to unforgettable? Here are a few creative ways to elevate your recipe:
1. Add a Splash of Extracts
- A few drops of banana extract or vanilla bean paste will deepen the flavor profile without overpowering the dish.
- Love coconut? Coconut extract pairs surprisingly well with bananas and vanilla wafers.
2. Drizzle in Sauce Layers
- Thin layers of caramel sauce or dulce de leche between the pudding and banana layers add a rich sweetness.
- You can also try melted Nutella or chocolate ganache for a more indulgent twist.
3. Spice It Up
- Add a pinch of cinnamon or nutmeg into the pudding mixture.
- Want a little heat? A dash of cayenne and cinnamon combo gives it a subtle kick.
4. Swap the Cookies
- Try butter cookies, graham crackers, or shortbread instead of vanilla wafers for a new texture and taste.
- Crushed Biscoff or golden Oreos? Game-changer.
Fun Toppings and Mix-ins to Try
Don’t stop at the last layer of vanilla wafers. Go big on toppings to make it party-ready or kid-approved!
| Topping | Flavor Benefit |
|---|---|
| Crushed toffee bits | Crunchy, buttery sweetness |
| Mini chocolate chips | Adds texture and contrast |
| Toasted coconut flakes | Brings tropical vibes |
| Whipped cream rosettes | For elegant presentation |
| Fresh sliced strawberries | Color and tartness |
Try Mix-ins:
- Peanut butter swirls or chopped candied nuts for a nutty twist.
- Layer with mini marshmallows or crushed pretzels for a salty-sweet balance.
These tweaks not only enhance taste but also improve the look—perfect for parties, potlucks, or just showing off on Instagram.
Don’t miss our Brazilian Mounjaro Recipe for another globally inspired twist with familiar ingredients.
Banana Browning & Storage Tips
Not Yo Mama’s Banana Pudding may be delicious, but one common issue can quickly turn your gorgeous dessert into a mushy, gray mess: browning bananas. So let’s talk solutions specific to this popular recipe. You’ll learn how to prevent that unappetizing color change and keep your Not Yo Mama’s Banana Pudding looking fresh, vibrant, and photo-worthy for longer.
How to Keep Bananas from Turning Black
Bananas oxidize fast. Once sliced and exposed to air, the flesh starts turning brown almost immediately. Here’s how to slow that down without affecting the flavor:
1. Light Citrus Spritz
- Mist the banana slices with lemon or pineapple juice before layering.
- The mild acidity helps prevent browning and blends well with the pudding’s flavor.
2. Assemble Just Before Serving
- Wait until you’re ready to eat before layering in the bananas. This method ensures they’re at peak freshness when guests dig in.
3. Layer Tightly
- Make sure the bananas are completely covered by pudding and wafers.
- The less air contact, the longer they stay yellow and firm.
Bonus Tip: Using firm, just-ripe bananas will help delay browning naturally.
Storing Your Pudding for Best Freshness
Not Yo Mama’s Banana Pudding is a great make-ahead dessert—if you store it right. Here’s what you need to know:
How Long Does It Last?
- In the fridge: up to 4 days, though texture is best within the first 48 hours.
- Freezing is not recommended, as bananas and whipped topping don’t thaw well.
Best Storage Method:
- Cover the dish tightly with plastic wrap or an airtight lid.
- Keep chilled and away from strong-smelling foods like onions or garlic—pudding absorbs odors easily.
Can You Make It Ahead?
Absolutely! Assemble everything except the top wafer layer, and store in the fridge overnight. Add the final cookie layer just before serving for that perfect crunch.
Looking for something equally indulgent with longer shelf life? Check out our Dubai Pistachio Chocolate Bar—an elegant treat that stores beautifully.
French Vanilla vs. Regular Vanilla
If you’ve ever stared at the pudding aisle wondering whether to go with French vanilla or regular vanilla, you’re not alone. In Not Yo Mama’s Banana Pudding, this choice can make or break your flavor game.
Taste & Texture Differences Explained
Let’s start with the basics: both flavors share a vanilla base, but French vanilla goes a step further. It’s creamier, richer, and more dessert-like—exactly what you want in a decadent banana pudding.
French Vanilla:
- Made using egg yolks in the base
- Has a custard-like, creamy mouthfeel
- Offers richer, deeper vanilla flavor
Regular Vanilla:
- Made without egg yolks
- Lighter and more basic in flavor
- Often used for general pudding applications or lighter desserts
When using French vanilla in banana pudding, you’ll notice:
- A silkier pudding texture
- A more luxurious depth of flavor
- Better pairing with tangy cream cheese and sweetened condensed milk
| Characteristic | French Vanilla | Regular Vanilla |
|---|---|---|
| Flavor Depth | Deep, rich, custardy | Light, sweet, basic |
| Texture | Creamy, thick | Lighter, more gelatinous |
| Ideal Use in This Recipe | Yes | Only if French isn’t available |
Still unsure? Grab both and do a side-by-side taste test. You’ll taste the upgrade instantly.
When to Use One Over the Other
If you’re short on time or options, regular vanilla pudding can technically work—but it won’t give you that ultra-creamy wow-factor. So:
- Use French vanilla when you’re serving guests or making this for an event.
- Use regular vanilla if that’s all you have on hand—just be sure to boost the flavor with a dash of vanilla extract or banana essence.
Need more custard-style dessert ideas? Don’t miss our rich and smooth Creamy Custard Recipe that’s perfect for classic dessert lovers.
Common Mistakes and Fixes
Even the best banana pudding lovers slip up sometimes. From soupy texture to bland flavor, little missteps can ruin an otherwise perfect dessert. Here’s how to avoid them and save your Not Yo Mama’s Banana Pudding before it’s too late.
Why Your Banana Pudding Turns Out Runny
Runny pudding is one of the most common complaints—and it’s completely avoidable. If you’ve ever asked, “Why is my banana pudding so runny?”, here are the usual culprits:
1. Not Mixing Pudding Thoroughly
If you don’t whisk your pudding mix long enough, it won’t firm up.
- Use cold milk (preferably almond or whole) and whisk until thick.
- Let it sit a few minutes to set before combining with other ingredients.
2. Not Chilling Long Enough
Pudding needs time to settle and bond with other ingredients.
- Refrigerate for at least 2 hours, but overnight is best.
- This helps the wafers soften and the pudding solidify.
3. Overripe Bananas
Very soft bananas release too much moisture and break down quickly.
- Use ripe but firm bananas to prevent excess liquid in your layers.
4. Using Low-Fat Dairy Substitutes
Light cream cheese and whipped topping won’t hold as firmly.
- Stick to full-fat versions for better structure and flavor.
Mistakes in Layering and Mixing to Avoid
The layering process is more than visual—done right, it improves texture and flavor:
Mistake #1: Skipping the Bottom Cookie Layer
This layer acts as a foundation. Skipping it leads to soggy bananas and a slushy base.
Mistake #2: Overmixing the Cream Cheese Mixture
Whipping the cream cheese with topping too hard removes all the fluffiness.
- Always fold gently to preserve airiness.
Mistake #3: Adding the Final Cookie Layer Too Early
Cookies on top can get soggy if added too far in advance.
- Add just before serving for the best crunch and presentation.
Mistake #4: Not Covering When Storing
Air exposure dries out the top and darkens the bananas.
- Use plastic wrap or a tight-fitting lid.
Want more no-fail desserts that come together easily? Check out our Cottage Cheese Cookie Dough—a fun and foolproof snack or dessert fix.
Serving Ideas & Presentation
You’ve made your luscious Not Yo Mama’s Banana Pudding, now let’s make it look as good as it tastes. This dessert is already a crowd-pleaser, but with the right presentation, it becomes unforgettable.
The Best Occasions to Serve This Dessert
This banana pudding recipe is ultra-versatile and always a hit. Here’s when to whip it up:
- Holidays (Thanksgiving, Easter, Christmas): Serve chilled in a trifle dish or casserole pan.
- Potlucks & BBQs: Pre-slice it into squares for easy grabbing.
- Birthday Parties: Add chocolate chips or sprinkles for extra fun.
- Baby Showers or Brunches: Serve in mini dessert cups or jars for an elegant touch.
Looking for another crowd-favorite with unique layers? Don’t miss our Tortilla Cinnamon Rolls—easy to prep and always gone fast!
Make-Ahead Tips for Parties and Gatherings
Want to impress without stressing day-of? This dessert actually gets better the longer it sits (up to 24 hours ahead).
Tips:
- Prep a day in advance, but hold off on the top layer of cookies until just before serving.
- Serve chilled, not frozen.
- For events, portion into small cups with mini spoons—presentation + portability = win!
Optional Garnish Ideas:
- Sliced banana on top (spritzed with lemon to prevent browning)
- Crushed cookies
- Whipped cream and mint sprig
Not Yo Mama’s Banana Pudding – Frequently Asked Questions (FAQs)
How to jazz up banana pudding?
Add layers of caramel, Nutella, or cinnamon for extra depth. Swap vanilla wafers for shortbread or crushed cookies, and add toppings like chocolate chips, berries, or toasted coconut.
What can I add to banana pudding to make it thicker?
Use full-fat cream cheese and proper whisking of the pudding. Avoid overripe bananas and let it chill overnight to firm up naturally.
What can you put on bananas to keep them from turning black in banana pudding?
Lightly mist banana slices with lemon or pineapple juice. Also, ensure they’re fully covered with pudding to limit air exposure.
Can you use French vanilla pudding for banana pudding?
Absolutely! French vanilla adds a richer, custard-like texture and deep flavor that enhances the overall dessert.
What is the difference between French vanilla and regular vanilla pudding?
French vanilla uses egg yolks for a creamier texture and deeper flavor, while regular vanilla is lighter and simpler.
Why is my banana pudding so runny?
This happens when the pudding isn’t set, the bananas are too ripe, or low-fat ingredients are used. Always whisk well, fold gently, and chill sufficiently.
Not Yo Mama’s Banana Pudding—The No-Bake Dessert You’ll Make Again and Again
Whether you’re throwing a summer BBQ, prepping for a holiday, or just want something quick and crowd-pleasing, Not Yo Mama’s Banana Pudding delivers big flavor with little effort. Its velvety pudding, tangy cream cheese, ripe bananas, and iconic vanilla wafers come together in a no-bake masterpiece you’ll be proud to serve again and again.
Make Not Yo Mama’s Banana Pudding your own by tweaking the ingredients, layering creatively, and dressing it up with bold toppings. With a few smart tips—like folding for fluffiness, using French vanilla pudding, and properly storing your leftovers—your version of Not Yo Mama’s Banana Pudding will outshine any store-bought pudding cup, every single time.
Looking for more easy desserts? Try our Zucchini Bread Recipe or Cloud Coffee for your next sweet fix.
Print
Not Yo Mama’s Banana Pudding: The Ultimate Creamy No-Bake Dessert Twist
Not Yo Mama’s Banana Pudding is a wildly popular no-bake dessert layered with French vanilla pudding, fresh bananas, creamy whipped topping, and smooth cream cheese. Sweet, Southern, and utterly irresistible—this chilled treat is perfect for gatherings or anytime you need a nostalgic dessert fix.
- Total Time: 2 hours
- Yield: 12 servings
Ingredients
2 bags Vanilla Wafers
6 to 8 bananas, sliced
2 cups milk or almond milk
1 (5 oz.) box French Vanilla pudding
1 (8 oz.) package cream cheese
1 (14 oz.) can sweetened condensed milk
1 (12 oz.) container whipped topping, thawed
Instructions
1. Line the bottom of a 13×9 pan with vanilla wafers.
2. Add a layer of sliced bananas over the wafers.
3. Whisk the pudding mix with milk until thick and creamy.
4. In a separate bowl, blend cream cheese and sweetened condensed milk until smooth.
5. Fold the whipped topping into the cream cheese mixture.
6. Combine the pudding and cream cheese mixtures together until well blended.
7. Pour the mixture evenly over the bananas in the pan.
8. Top with remaining vanilla wafers and chill for at least 2 hours before serving.
Notes
Make it a day ahead for even better flavor.
Use ripe but firm bananas to prevent mushiness.
Top with crushed wafers or extra whipped topping before serving for a fun finish.
- Prep Time: 20 minutes
- Cook Time: 0 minutes
- Category: Dessert
- Method: No Bake / Layered
- Cuisine: American
- Diet: Vegetarian