
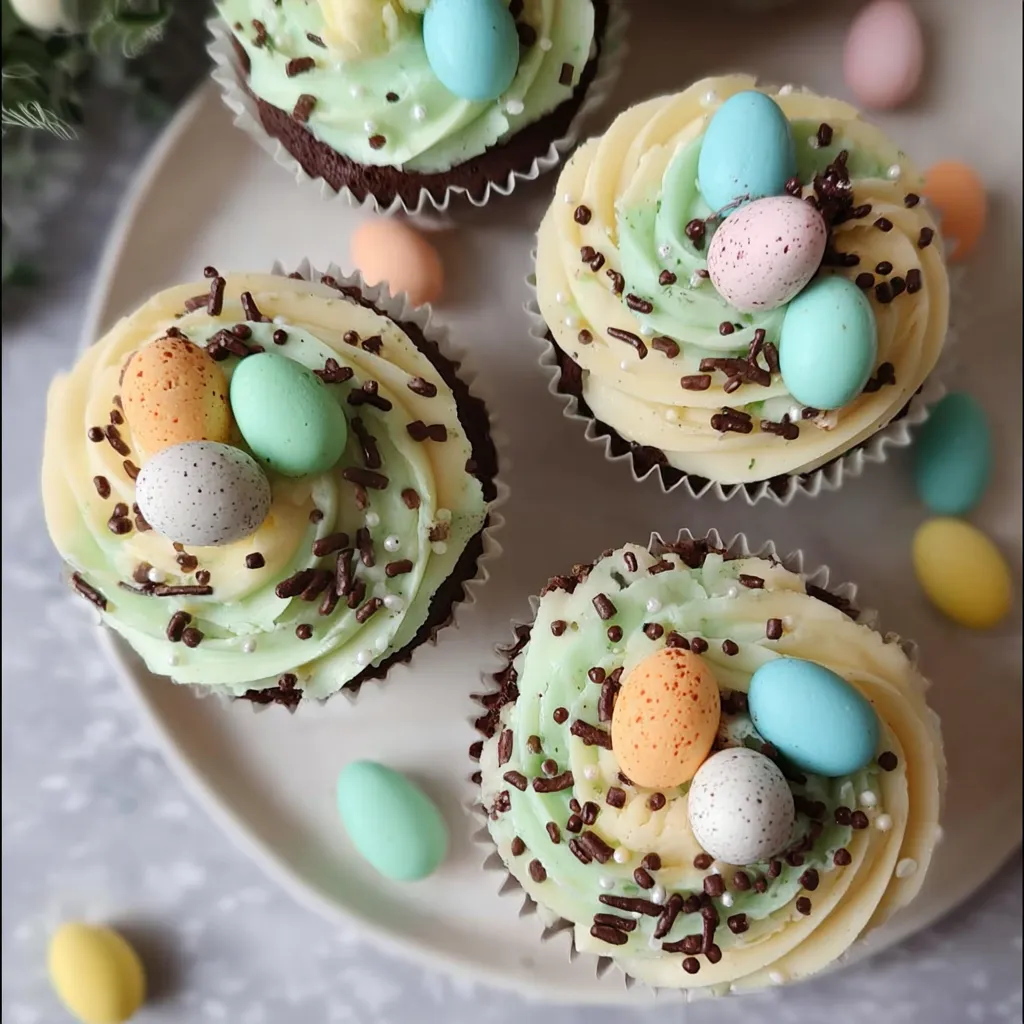
As the flowers begin to bloom and the days grow longer, there is no better way to celebrate the arrival of spring than with a batch of homemade Speckled Egg Easter Cupcakes. These aren’t just your standard chocolate cupcakes; they are a visual and culinary delight designed to mimic the beautiful, natural aesthetic of a Robin’s egg. Featuring a deep, rich chocolate sponge infused with melted dark chocolate and topped with a velvety teal buttercream, they capture the essence of the season perfectly. Whether you are hosting a festive Sunday brunch or looking for a fun baking project to tackle with the kids, these cupcakes offer that elusive “wow factor” without requiring professional pastry skills. The secret lies in the simple yet effective cocoa-splatter technique that brings these little cakes to life.
Why You’ll Love This Recipe
You’ll love this recipe because it strikes the perfect balance between gourmet results and approachable techniques. First, the chocolate base is incredibly moist, thanks to the combination of light brown sugar and melted dark chocolate, which provides a fudgy texture that stays fresh for days. Secondly, the aesthetic is undeniably charming. The “speckled” look is incredibly trendy yet classic, making these cupcakes the focal point of any dessert table. Finally, the recipe is highly customizable. While we’ve opted for a teal vanilla frosting, the core chocolate sponge serves as a versatile canvas for any flavor profile you enjoy. It’s a foolproof way to impress guests with minimal stress and maximum flavor.
What Is a Speckled Egg Cupcake?
A Speckled Egg Cupcake is a thematic dessert inspired by the pale blue and teal eggs of birds like the American Robin or the Song Thrush. Traditionally, these cupcakes feature a pastel-colored frosting (usually blue or teal) that is “speckled” with tiny brown dots to create a realistic eggshell appearance. The “speckle” is typically achieved by flicking a mixture of cocoa powder and water or vanilla extract over the frosting using a clean paintbrush or pastry brush. This specific version elevates the concept by using a high-quality chocolate sponge base, ensuring that the cupcakes taste every bit as good as they look. It’s a celebration of nature’s spring palette in edible form.
Ingredients Overview
To create these masterpieces, you’ll need a mix of pantry staples and a few specific decorating items. For the Cupcake Mix, we use 150g of unsalted butter or a high-quality baking spread to ensure a tender crumb. The 150g of light brown soft sugar is crucial—it adds a hint of caramel-like depth that white sugar lacks. We use 125g of self-raising flour and 25g of high-quality cocoa powder to provide structure and chocolatey intensity. Adding 100g of melted dark chocolate into the batter is the “secret weapon” for that extra fudgy finish.
For the Buttercream, you’ll need 200g of softened unsalted butter and 400g of icing sugar. A teaspoon of vanilla extract provides that classic bakery scent. The teal color is achieved with just a few drops of blue food coloring (gel is best for vibrant results). The Decoration involves a simple paste of 1 tbsp cocoa powder and 1 tbsp water, which serves as our “ink” for the speckling. Finally, top each cake with your favorite chocolate Easter eggs—miniature candy-coated eggs work best to maintain the scale of the design.
Ingredient Substitutions & Tips
If you find yourself missing an ingredient, don’t worry! For the cupcake base, you can substitute the light brown sugar with granulated sugar, though the texture will be slightly less moist. If you don’t have self-raising flour, use 125g of plain flour mixed with 1.5 teaspoons of baking powder. For the frosting, if you prefer a less sweet finish, you can swap the American buttercream for a Swiss Meringue buttercream, though the speckling technique might require a slightly longer setting time in the fridge. For a vegan-friendly version, replace the butter with a plant-based block, the eggs with flax-eggs, and use dairy-free chocolate; the results are surprisingly comparable!
Step-by-Step Instructions
- Preparation: Start by preheating your oven to 180ºC (160ºC fan). Line a 12-hole muffin tray with high-quality paper liners. This ensures even rising and easy removal.
- Creaming: In a large mixing bowl, beat 150g of softened butter and 150g of light brown sugar together. Use an electric hand whisk or a stand mixer for about 3-5 minutes until the mixture is pale and creamy.
- The Batter: Sift in the flour and cocoa powder to avoid lumps. Add the three medium eggs and the 100g of melted dark chocolate. Mix on low speed until just combined. Over-mixing at this stage can lead to tough cupcakes, so stop as soon as no streaks of flour remain.
- Baking: Distribute the batter evenly among the 12 cases. Bake for 18-22 minutes. You’ll know they’re done when a skewer inserted into the center comes out clean. Transfer to a wire rack to cool completely.
- Frosting: While the cakes cool, beat the 200g of frosting butter until it’s very pale and smooth. Slowly incorporate the icing sugar and vanilla. Add the blue food coloring one drop at a time until you reach your desired teal shade.
- Piping: Transfer the buttercream to a piping bag fitted with a 2D closed star tip. Pipe generous swirls onto the cooled cupcakes.
- The Speckle: In a small bowl, whisk the 1 tbsp cocoa powder and 1 tbsp water. Dip a pastry brush into the paste. Holding the brush over the cupcakes, use your finger to flick the bristles, sending a fine mist of cocoa “speckles” onto the frosting.
- Finishing: Place 2-3 chocolate eggs on top of each cupcake while the frosting is still fresh so they stick securely.
Expert Baking Tips
To achieve the best results, always ensure your ingredients are at room temperature. Cold eggs can cause the butter mixture to split, leading to an uneven bake. When melting your dark chocolate, do so gently in 20-second bursts in the microwave or over a bain-marie to prevent scorching. For the frosting, the longer you beat the butter initially, the lighter and fluffier your buttercream will be—aim for at least 5 minutes of beating before adding the sugar. If your “speckle” paste feels too thick to flick, add a few more drops of water until it reaches the consistency of thin ink.
Mastering the Speckle Technique
The speckle technique is what transforms these from simple cupcakes into professional-looking treats. To minimize mess, place your frosted cupcakes inside a large, deep cardboard box before you start flicking the cocoa paste. This catches any stray “ink” and keeps your kitchen counters clean. Use a stiff-bristled pastry brush or even a clean, dedicated toothbrush for the finest mist. Practice a few flicks onto a piece of paper towel first to get a feel for the distance and pressure required. The goal is a random, natural distribution of dots rather than large splotches.
Serving Suggestions
These cupcakes are best served on a simple white or wooden cake stand to let the vibrant teal and chocolate colors pop. They make a fantastic centerpiece for an Easter dessert table or a charming addition to a spring-themed afternoon tea. For an extra festive touch, you can nestle the cupcakes in a “nest” of edible shredded paper or toasted coconut dyed green to look like grass. Serve alongside a pot of Earl Grey tea or a glass of chilled milk for the perfect pairing.
Storage & Make-Ahead Tips
You can easily make the cupcake bases 24 hours in advance; simply store them in an airtight container at room temperature once cooled. The buttercream can also be made ahead and kept in the fridge, but let it come to room temperature and give it a quick whisk before piping. Once fully decorated, these cupcakes will stay fresh for 3+ days at room temperature. While you can freeze the un-iced cupcakes for up to 3 months, the finished cupcakes with buttercream and speckles are best enjoyed fresh to maintain the texture of the frosting.
FAQs
Can I use milk chocolate instead of dark chocolate in the batter?
Yes, you can! However, the dark chocolate provides a better color and a more intense flavor that balances the sweet buttercream. If using milk chocolate, the sponge will be slightly sweeter and lighter in color.
Why is my buttercream too soft to pipe?
This usually happens if the butter was too warm or if the kitchen is hot. Try chilling the buttercream in the fridge for 15-20 minutes, then give it another quick whip before piping.
Is the cocoa splatter messy?
It can be! As mentioned in the “Mastering the Speckle” section, using a large box or laying down plenty of parchment paper is essential to keep the splatter contained.
Can I use liquid food coloring?
Liquid coloring can thin out the buttercream. Gel or paste colors are highly recommended for achieving vibrant shades like teal without affecting the consistency of the frosting.
What kind of chocolate eggs work best?
Any small, candy-coated chocolate eggs work perfectly. The matte finish of traditional “mini eggs” complements the speckled look beautifully.
These Speckled Egg Easter Cupcakes are a testament to how simple techniques can yield extraordinary results. By combining a rich, melted-chocolate sponge with the whimsical “Robin’s egg” aesthetic, you create a dessert that is as joyful to look at as it is to eat. Don’t be afraid to get a little messy with the cocoa splatter—that’s where the character of the cupcake truly comes from! Happy Easter baking!